

Today’s post is really two tutorials in one: how to sew a silk pillowcase from a scarf and how to make DIY pillow forms.
I love me some silk scarves, and vintage linens in general and my walls back up that statement. Since I can’t wallpaper my whole house with silk scarves, I’ve been trying to think up ways to display my vintage linens that don’t involve jumbo or custom picture frames.
Enter the silk pillowcase. This is a simple simple project that’ll teach you how to take a vintage silk scarf and turn it into a simple silk pillowcase to cover over a DIY pillow form. Learning how to make a pillow form is a basic home decor sewing project. DIY pillow forms are less expensive than store bought ones. Even better? You can customize the size on your DIY pillowcase to fit your silk pillowcase perfectly.
The end result will be a beautiful statement cushion that’ll rival anything you could plonk down big money for. And when people inevitably admire it, you’ll be proudly able to say, “Yeah, made it myself”.
So grab your vintage Vera and let’s get to working on how to sew a silk pillowcase.
elizabethmadethis.com is a participant in the Amazon Services LLC Associates Program, an affiliate advertising program designed to provide a way for websites to earn advertising revenues by advertising and linking toSome of the links below are affiliate links. This means that, at zero cost to you, I will earn an affiliate commission if you click through the link and finalize a purchase.

Table of Contents
Supplies for making a silk pillowcase + DIY pillow forms
Where to find vintage silk scarves
I’ve spent a shocking amount of time searching around for vintage silk scarves, and I have opinions on where you can find them! Here are the 3 best places to find vintage silk scarves:
- Thrift stores: the holy grail of awesome sewing supplies at thrift stores is a good silk scarf. You will have to look consistently if you want to catch them. The best time to find them is between Spring and the start of Fall. Always look at the tags and pass on the ones that are polyester unless you really like the print. Why be snobby? Because you will never know just how lovely a silk scarf is until you feel one in your hands.
- Antique shops: like thrift stores but less funky and more vintage. If a seller has hats, they likely will have scarves too. Again, watch your labels and make sure you pick up a silk scarf.
- Etsy/Ebay: I put these in the same category because often sellers will list their scarves in both places. Like I said, I’ve spent a LOT of time looking! Online shops are helpful in that you can search for specific colors or makers of scarves you love. I never pass up Vera scarves if the price is good, but sometimes no name designers with cool designs surprise me. Other good names to look for that aren’t too expensive: Echo, Anne Klein, Liz Claiborne
Wherever you find your scarf, make sure you don’t use a chiffon or other sheer weave, but something that’s opaque. This project is best suited to heavier silk scarves that have a little heft to them. Also make sure your scarf is square or rectangular. Skinny necktie type scarves won’t work nor will weird shaped ones.
How to make DIY pillow forms
First things first, let’s make your pillow form.
Cut two squares (or rectangles) of fabric the size of your scarf. I can’t give specific dimensions since it’ll depend on how big your scarf is. You want these squares to be the same size as your scarf so that when you sew it, the pillow is nice and stuffed. Partially stuffed pillows are sad and we don’t want that!

Next, put your fabric right sides together and stitch around the whole pillow, using 3/8″ seam allowances. Be sure to leave a hole about the size of your hand in the middle of one side.
After that, turn the pillow through the hole and give everything a good press with your iron. Be sure to press the seam allowances in the hole area towards the inside so that the edges are even with the rest of that side.
Stuff your pillow
Next, start grabbing handfuls of polyester fiberfill and filling the pillow. Use your hands to fluff out the stuffing into the corners. Periodically, fluff everything up.


The goal here is to get a pillow that’s evenly stuffed. It’ll take more stuffing than you think, so be patient. Keep fluffing and moving the stuffing around until it looks nice.
Close up the hole
To close up the hole, first thread and knot your hand needle.
You’ll be using a whipstitch to close up this hole. To do this, bring up your knotted needle to right side. Next pierce the other
side, letting the fabric loop between layers.
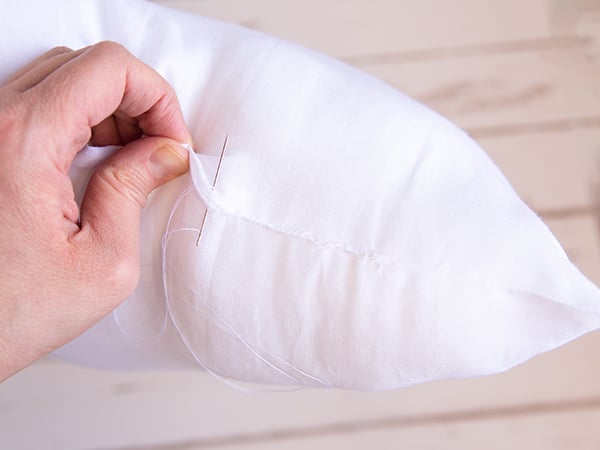
Bring up the needle close to the first stitch and make another looping stitch. Tie off the thread when you get to the end of the hole.
That’s all there is to making DIY pillow forms. This is a quick little thing that you can make for any new DIY cushion you want to make. Now that you’ve learned how to make a pillow form, read on to see how to cover it with your beautiful silk scarf.
Loving learning how to sew a silk pillowcase? Here’s some more easy sewing projects you’ll love:

How to sew the simplest, cutest dolls around

Make the easiest quilt with cheater’s prints

Fabric scraps happen. Here’s how to turn them into cute yoyos pronto!

Elizabeth Farr is the writer behind the Elizabeth Made This blog where she shares helpful sewing tips, step by step sewing tutorials and videos to help you explore your creativity through sewing. She has written sewing Eguides and patterns, been a featured teacher at Rebecca Page’s Sewing Summit and Jennifer Maker’s Holiday Maker Fest and her work has appeared in Seamwork and Altered Couture magazines. She also created a line of refashioned garments for SEWN Denver. When her sewing machine isn’t humming, she’s playing and teaching violin, and hanging around a good strategic board game with her husband and 4 kids.