
Today we’re talking about how to sew a quilt the simplest way that’s perfect for beginners.
True confessions: I’m a lazy, lazy quilter. The truth is while I’ll painstakingly make a silk jacket complete interfaced with hand basted silk organza and hand made covered snaps, when it comes to quilting, I wanna go Rick Bobby style. Fast.
With that in mind, I’ll show you how to find the easiest quilting fabrics for fast quilting. Then I’ll share a simple method for sewing up your quilt. After that, you’ll learn how to finish a quilt without spending forever getting it done. I’ll finish by showing you how to skip the binding on a quilt to make your sewing go even quicker.
How quick, you might ask? I clocked in at 52 minutes for the smaller USA quilt and 85 minutes for the larger Utah parks quilt.
This is a quick project perfect for sewing beginners or quilting beginners that will help you:
- Practice straight line stitching
- Explore alternatives to binding a quilt
- Skip stinky quilt basting spray
This is even a great project for kids learning how to sew. They’ll get some good basic fabric handling in, plus practice tying square knots.
So grab some batting and let’s dive into how to sew a quilt!

elizabethmadethis.com is a participant in the Amazon Services LLC Associates Program, an affiliate advertising program designed to provide a way for websites to earn advertising revenues by advertising and linking toSome of the links below are affiliate links. This means that, at zero cost to you, I will earn an affiliate commission if you click through the link and finalize a purchase.
Table of Contents
Supplies for making a quilt
Quilting basics and definitions: What’s in a quilt?
QUILT = quilt top + batting + backing fabric +extra stitches for decoration/to hold down the batting
Quilt top: the nice side of the quilt. Here we’re making it with the done for you fabric that is a cheater’s print/quilt panel. Quilt tops are often made from big combinations of many fabrics, sewn together in sometimes very intricate ways.
Backing: the “wrong” side of a quilt. It can be made from one fabric or more, usually of a plain solid fabric.
Batting: sheet of a lofty, fluffy cotton, polyester, wool or other fiber that goes between the quilt top and backing. The batting adds dimension and warmth to a quilt.
Quilting: the act of adding extra stitches to a quilt to secure down the batting and add decoration. Quilting can be done by hand by tying a quilt, or quilting by hand. More intricate designs can be quilted by machine or a specialty longarm quilter.
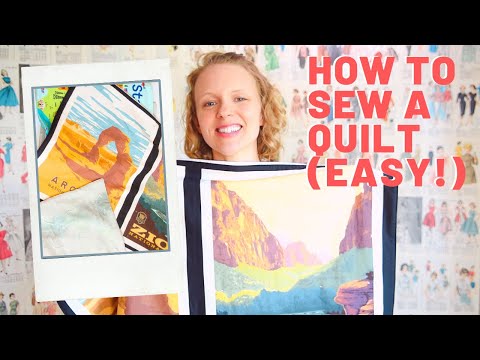
How cheater prints make for a quick quilt
What’s a cheater panel and how does it make for a fast easy quilt you can make about an hour?

These fabrics are called by several different things: cheater prints, cheater panels or quilt panels. All of them have one thing in common. The fabric is printed with some of the elements you’d find in a traditionally pieced quilt. Quilt panels might also just be standalone large scale pictures. Just be aware of that when you’re searching for fabric.
Look for things like borders, patchwork or the look of multiple fabrics all printed in one length of fabric.
When you use a cheater print, you’ll save tons of time in cutting and piecing your quilt top.
For this project, I recommend using a panel that’s not too big. Most of the panels I’ve found are between 20″x44″ to 36″x42″. I really love this Utah parks panel. Also, here is a similar USA map panel to the one I’m using for this beginning quilt tutorial. My dachshund loving kids would love this patchwork cheater print from Spoonflower too.


What type of batting should I use for quilts?
I think batting is a personal preference thing. I personally like using 100% cotton batting. It’s soft once you assemble everything plus natural fibers are just nice.
Ultimately you’ve lots of options. Higher loft polyester batting will make a nice fluffy quilt that’ll be nice and cozy. For this project, pick a crib sized package which is about 34-36″x45″. I’m using Warm & Natural needled cotton batting. I just came across this fusible (!!!) cotton batting. A fusible batting will allow to to skip the next step entirely and make this whole process even easier!
Even fleece can be a nice added layer for extra warmth in place of traditional batting. Experiment and find which batting you like the best!


What can I use for backing fabric?
Anything you have around works for backing fabric, as long as you’re using a woven fabric that’s medium-heavy weight. Often you’ll see plain cottons used for quilt backs. Muslin, Kona cottons, flannel, and sheets are all great choices. Sheets work great for backings since they’re wider than typical fabric!
Quilting fabric manufacturers often make quilt backing fabrics that are 108″ wide. That’s double the width of typical quilting cotton fabrics. Here’s a few good ones:


For heavier fabrics, denim and corduroy can also make nice backing fabrics too.
How to sew a quilt: How to prep your quilt
First things first, we need to baste the quilt panel to the batting. We don’t want the batting shifting around on us while we’re working with it, so we’re going to glue it.
Yes, I quite literally said glue it. Quilter’s often use quilting basting spray which is a spray adhesive to temporarily baste the batting to the outside. I personally am not a fan of quilt basting spray because of the fumes.
How to use basting spray to prep your quilt top
If you do work with quilt basting spray work OUTSIDE. Cut a piece of batting just a tiny bit bigger than the panel. Lay down your top fabric wrong side up on a dropcloth. Next, spray it lightly with the basting spray. Quickly unroll and smooth the batting to the fabric, making sure that the batting isn’t bunching up.

Allow the quilt to sit for a while. This will give the spray a chance to dry and the fumes to dissipate.
Using a glue stick to baste your quilt
Because we’re working with small quilt panels, I recommend the noble glue stick. You won’t get fumes from the glue stick like you do with basting spray. Best of all, when you’re finished with the quilt, pop it in the wash, and the glue is gone.


Lay out the batting, then add dabs of glue stick on the backside of a corner of your quilt panel. Stick down the fabric to the panel. Continue adding glue to the backside and sticking it down to the batting.
Machine basting the top to the batting
Whether you’ve used the basting spray or the glue stick, finish prepping the top by stitching close to the edge of the fabric through both layers. Use your longest machine straight stitch here. For me, that’s 5.0mm long.
Trim away the extra batting around the edges.


How to sew a quilt: Adding the backing to the quilt top
Now the fun part!
Cut a piece of backing fabric slightly bigger than your batting/top layer. Place your top layer and backing fabric together so that the right sides are facing. Keeping the batting side up, pin along the edges every few inches.
Move your needle all the way over to the left on your machine (0.0 width). Stitch around the quilt with a shorter 2.6mm straight stitch, using your presser foot as a guide. Let the presser foot ride along the edge of the fabric. This will be almost a 1/2″ seam allowance. When you get to a corner, pivot stop just shy of the edge. Keeping the needle down in the fabric, lift the presser foot and pivot the quilt. Lower the presser foot and keep stitching. Keep stitching all around the quilt.
Leave a 6″ hole along one of the sides unstitched.

When you’re done stitching, trim away the extra backing fabric. Make sure to cut the corners at an angle to cut down on the bulk when you turn.
Turning the quilt

Turn the quilt through the hole. Reach in and pull the quilt out of the hole. Use your hands to smooth out the edges, and work out the corners with your fingers. Then use a steam iron to press the edges.

When you get to the hole area, press, keeping the unstitched edges even with the sewn edges.
Topstitch the quilt
Stitch all around the quilt with a 3.0mm length straight stitch close to the edge.

I like to use a ditch quilting foot. It has a little blade that rides along edges. It’s not 100% necessary to use a foot like this, but it does make for easy, pretty topstitching.

If you do use a ditch quilting foot, move your needle to the left so your straight stitch has a 1.0 width.
How to sew a quilt: How to tie a quilt
Making stitches with embroidery floss
Your work on learning how to sew a quilt is almost done. The last thing we need to do is tie the quilt. Tying is the easiest way to keep the batting down. It’s a minimal, no-fuss finish that lets the fabric speak for itself. That it’s crazy fast and gives the quilt a fun texture on the wrong side is even better!
First, load up your hand needle with a long length of embroidery thread.

After that, use your quilting ruler to make marks ever 4.5″ on the backside of your quilt. Most battings say on the package that you can make rows of stitching up to 10″ apart. Experiment with what you like. I rather like the 4.5″ if for no other reason than I have a handy square ruler that makes it easy to mark!
From there, poke the needle through one hole, bringing it to the right side of the quilt. Leave about a 6″ tail on the floss.


Poke the needle through towards the back about 1/4″ away from your first stitch. Bring all the embroidery floss towards the back. Without cutting the floss, poke the needle through the next hole and make another stitch the same way.
Keep making small stitches like this over all your marks, loading up your needle with more floss as you need.
Finishing the ties
When you’ve made stitches at all of your marks, cut the floss between each stitch. See how you have 2 ends at each of your marks?
From here, make a square knot at each of the marks with the 2 ends. Snip the ends so that the tails are about 1″ long.
Watch how to sew a quilt video tutorial

So that’s how to sew a quilt! If you love this project, check out these other quick sewing projects.

How to sew a 7 minute DIY Zipper bag
The most popular tutorial around these parts! It’s a great intro to working with zippers and perfect for scraps of fabric.

How to sew a pillowcase
15 minutes + you = lightning fast sewing project for everyone

10 minute full slip tutorial
A quickie refashion that’ll make your wrap dresses sing

Elizabeth Farr is the writer behind the Elizabeth Made This blog where she shares helpful sewing tips, step by step sewing tutorials and videos to help you explore your creativity through sewing. She has written sewing Eguides and patterns, been a featured teacher at Rebecca Page’s Sewing Summit and Jennifer Maker’s Holiday Maker Fest and her work has appeared in Seamwork and Altered Couture magazines. She also created a line of refashioned garments for SEWN Denver. When her sewing machine isn’t humming, she’s playing and teaching violin, and hanging around a good strategic board game with her husband and 4 kids.
My mother made “tied” quilts before I was born — and we used them all the time — to my knowledge, they were still around long after I left home, and in good shape! Of course, that was probably 50 years ago (I’m 73), but they had cotton batting, so washing them was done rarely, and very carefully! I have never made a quilt, though I have quilted some fabric to make much smaller projects. But you have inspired me to make one! Thanks!
I think tied quilts have a loveliness that’s all their own. What wonderful memories to have grown up with so many! Enjoy making your quilt!
I just bought 3 “Cheaters” quilt pannels, also of various National Parks! I have never quilted before and was anxious about the process. This tutorial is perfect for me and it won’t take me forever to finish the quilts for gifts!! I’m so glad I fly d this video!! Thank you so much!!
Awesome! Those panels are really lovely, and a tied quilt is a fantastic way to get your feet wet without getting too overwhelmed. I know you’ll love what you make!
When you say cheater panels, you mean the panels with prints like horses, mountains, forests, etc.?
Precisely–that or prints that have the look of blocks that have been pieced together but are in fact just one print.
It’s been years but I’ve made several cheater quilts with a sewing machine. I prefer a crib or twin size quilt for gifting. I also made one all cotton, very large quilt by hand. I would appreciate recommendations for online stores to select and purchase cheater quilts since we are now limited to the number of box stores.
Missouri Quilt co, Hawthorne Supply Co, and Superbuzzy always have a good selection of cheater prints, but can also Google “cheater quilt prints” and get a lot of good results.