

You say DIY denim jacket, I say YES! Denim jackets are one of my favorite subclasses of jackets.
Why do I love the denim jacket?
- They go with EVERYTHING in your closet
- There’s lots of ways to customize them plus
- They have a classic look that will never go out of style
Did I mention that it’s one of the easier jackets to make? Without a lining and easy to sew denim, this is a jacket style that’s perfect for an advanced beginner sewist.
Here you’ll find all my essential tips for making a DIY denim jacket you’ll wear for years. You’ll also learn where to buy jeans buttons because you’re gonna need a lot of them!

Table of Contents
First, find a denim jacket pattern you love
Before we get into tips for making a denim jacket from the ground up, you need to find a pattern!
There’s tons of great denim patterns out there. Be sure to check out 12 denim jacket patterns that’ll always keep you in style.
12 denim jacket patterns you’ll love
From classic to creative for everyone

Once you have your chosen pattern, it’s time to get to those denim jacket sewing tips.
Get your denim ready
What kind of denim makes the best jacket?
For my money, a good non-stretch denim is going to make the nicest jacket. It’s sturdy, it ages well and it feels good to wear.
Cone Mills denims are some excellent quality non-stretch denims to try. I love this olive green one from Threadbare Fabrics.
I just added another section to the Ultimate Jumbo Mega Guide to Online Fabric Stores for denim. Sourcing good denim is not always easy, so I did the hard work for you!
Over 200 of the best fabric stores
Where to find fabric of every type all around the world online

Once you have your denim, you need to pop it in the wash.
Wash that denim
It seems silly that sewing a denim jacket begins in the wash but it does. Denim shrinks, so wash and dry it before you start cutting a jacket. There’s nothing worse than going through making a whole garment to have it get shrunk later on in the wash!
Wash your fabric on the hottest setting you intend to wash it ever and then dry it on hot. If you want to preserve the color as much as possible, stick to cold water.
If you want a soft finish to your denim jacket, you can try adding a bottle of Coke to the wash. Let the fabric soak for a while before you run it through the cycle. I say try because sometimes this works and sometimes it doesn’t. Denims are all unique, and sometimes fibers don’t behave like we want!
After that, you’re ready to start making your jacket.
Finish seam allowances first
One of the easiest ways to make your construction easier is to serge around your pieces first.
2 layers of denim going through a serger to finish a seam will be quite bulky. Shoot, your serger might let you know how unhappy it is with you.
With seam allowances that are already serged, you can either press seams open or to one side and topstitch.
For those of us who don’t have the luxury of an industrial machine where Beast Mode is standard, this is a no-fuss way to deal with your seam allowances.
Practice your topstitching
Once you’ve cut out your jacket, set aside a little time to practice your topstitching.
You’ll need to decide what topstitching thread you like best. Plus, it’s always a good idea to practice getting nice even straight lines. And a practice swatch can help you adjust your tension correctly.

Topstitching is a major feature of any good DIY denim jacket, and when it’s off, it shows.
Best practices for topstitching fabric
Where to find fabric of every type all around the world online

Check out this post on topstitching. It breaks down the best feet and techniques to help your topstitching look the best. Plus there’s advice for topstitching with non-traditional threads because COLOR!

Organize your presser feet and thread
Weird but true: topstitching on a DIY denim jacket requires a little bit of organization. That’s because you’ll need to change thread and presser feet frequently.
To make the process faster, set out all of the presser feet and threads you need in a little tray. With the tray next to your machine, you can quickly grab whatever you need.
For the best topstitching on a DIY denim jacket, do this
Start every seam by sewing on a folded scrap of the fabric.
You’ll have to vary the thickness of your scrap based on which area you’re working on. A doubled layer will be the most common choice, but on thicker areas, and buttoned areas, fold the scrap more to avoid the thread being pulled down into the machine.
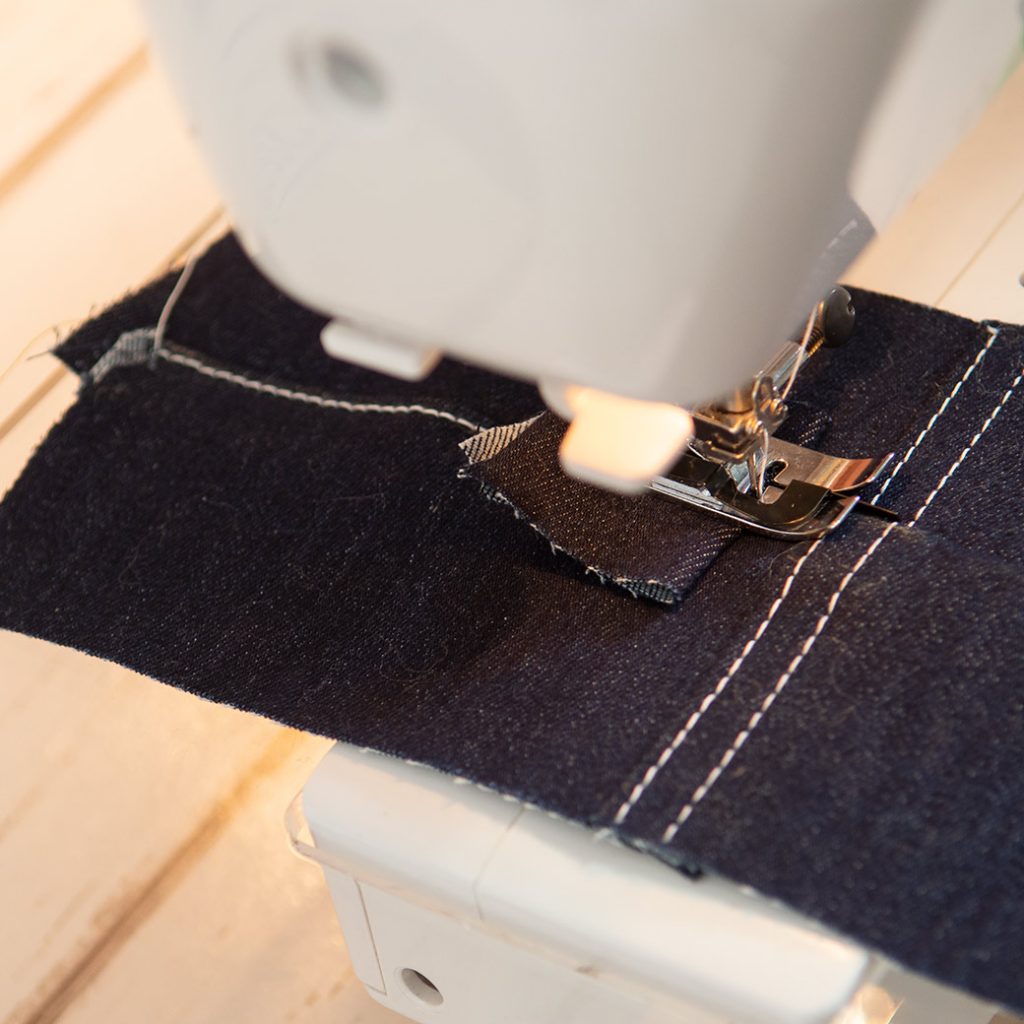
Basically, you want the back of the presser foot at the same thickness as the seam that you’re about to sew. This will help you too when you get to bulky seam crossings.
A “hump jumper” or “jean-a-ma-jig” will do the same job, but I’ve found sewing on the scrap is more reliable. Keep sewing onto the seam once you’ve sewn a few stitches on the scrap. You’ll have consistent length stitches all across the seam and no thread mess that gets tangled on the backside of the fabric!
Pressing denim
elizabethmadethis.com is a participant in the Amazon Services LLC Associates Program, an affiliate advertising program designed to provide a way for websites to earn advertising revenues by advertising and linking toSome of the links below are affiliate links. This means that, at zero cost to you, I will earn an affiliate commission if you click through the link and finalize a purchase.
When you’re deep into construction of your DIY denim jacket, you’ll need to press your seams well. Denim is thick, but it behaves oh so nice with steam and a good whack.
After every seam you sew in your jacket, press that seam on a high heat with lots of steam.

If you have it, a tailor’s clapper will make a big difference here. The weight will help flatten unwieldy seams and the wood will force the steam into the fabric.
All about tack buttons
Besides topstitching, the other big feature of a denim jacket are the tack buttons.
There’s a lot of them and installing them can sometimes be frustrating. I’ve certainly gone through my share of crooked buttons and broken off screws.

First, let’s start with where to buy jeans buttons.
Where to buy jeans buttons
I’ve had the best luck with tack buttons with screws. The screws seem to set better than the plain nail buttons that you’ll sometimes see.
When you go to buy jeans buttons, make sure to pick up a setter as well. Here are two places to find some good quality tack buttons.
- Ebay: this Ebay shop has a huge selection of decorative tack buttons. Think flowers, stars, animals and geometric designs. They also sell a small plastic handsetter with some of the sets. This little setter does a surprisingly excellent job setting straight, even buttons. See the demo below.
- Gold Star Tool: I love that this place has 99 cent shipping in the US. They have a great selection of hardware for jeans and sewing projects in general. Look for good rivets and plain tack buttons. There’s also hand setters and more heavy duty presses with various dies for setting rivets, tack buttons and other things. If you work with denim a lot, a high quality press is a worthwhile investment.
How to set a tack button

Here’s the 3 quick and easy steps to setting a tack button.
- Make a hole in your denim with an awl
- Place the screw in the backside of your fabric
- Set the button inside your setter. Put the screw in the backside of the button. Whack with a hammer a few times to set it.

Use tie interfacing to ease your sleeve caps
The sleeves on a DIY denim jacket can be tough to sew in because of the weight. Instead, cut strips of bias cut tie interfacing or fleece. You can find tie interfacing at a tailoring supplier like B Black & Sons. You can also just cut open an old unloved tie and reuse the interfacing.
1″ strips of tie interfacing work well here. Next, baste the interfacing to the seam allowance of the wrong side of your sleeve cap between the notches. Tug on the interfacing firmly while you stitch.
At the end of it, you’ll have a beautifully eased sleeve that’ll pop straight into the armhole without any drama.

Peggy Sagers does a good job of showing you how this works in the video.

So those are some ways to help you through your sewing process for a DIY denim jacket. With these tips, it’ll be a more fun sew for you, and you’ll love your new jacket!


Elizabeth Farr is the writer behind the Elizabeth Made This blog where she shares helpful sewing tips, step by step sewing tutorials and videos to help you explore your creativity through sewing. She has written sewing Eguides and patterns, been a featured teacher at Rebecca Page’s Sewing Summit and Jennifer Maker’s Holiday Maker Fest and her work has appeared in Seamwork and Altered Couture magazines. She also created a line of refashioned garments for SEWN Denver. When her sewing machine isn’t humming, she’s playing and teaching violin, and hanging around a good strategic board game with her husband and 4 kids.
I have been enjoying your sewing journey during the Suduko contest. All of your entry garments are perfection and coordinate quite well together. Thanks for your tip re: Dime buttons. I have not tried making denim garments because the fastener choices that have been presented to me did not appear secure. The Peggy Sager video was most helpful and I have some tie interfacing in my stash, so off we go…
Thanks for all the inspiration you have given me. Continued success to you in your personal life and sewing journey.
Thanks so much. I’ve tried every brand of tack buttons available to home sewists, and these ones really have been the best. You’ll love the tie interfacing for what it does in your jackets!
Love this!! Amazing jacket! Just visited your site after seeing your PR review. Can’t wait to see your Soduko grid!! What a wonderfully, exhausting contest!
Thank you! Exhausting is a good word for it! I think it’s been a little more than my usual sewing pace, so that hasn’t been too much, but all of the writing and photography–phew! Congratulations on getting to the end of your grid too! I love your cocoon cardigan.
Wow! That is a fantastic tip about folding a scrap to avoid the wobbly stitching. I will be doin that.
(and I love your jacket)
It really makes a difference, and it’s an easy thing to do because you always have scraps. And the self-fabric works best because it’s the same thickness as the fabric you’re working on!
I absolutely love, love, love everything about this jacket! The color is so gorgeous and it’s impeccably made. Thanks to your endorsement, I’m going to purchase that dime button assortment with the tool. I have some jeans and at least one denim jacket in my ToSew list, so those will work perfect!
Thanks so much! I knew when I saw that denim that it had to be a jacket. Enjoy the dime buttons. I tell you what, I’ve tried everything out there in the way of tack buttons, and these ones are by far the easiest to put in. Plus all the designs they have are a little more interesting than normal tack buttons too!
My God, this is really sooooo pretty! So Well-made and it fits you really perfect!!! The pattern is also really pretty! I can imagine this will be something you will be wearing a lot! I didn’t get to making something like this before, but will definitely pin this and hopefully someday I will have enough courage or selfconfidence to just try it 🙂 Thanks for all the advice too!!
Thanks Barbara. I’ve been wearing it with everything already! This is a really nice pattern too. Burda always delivers on fit and details!
CONGRATULATIONS!!!
Pingback: Wednesday Weekly #78 – Helen's Closet