
This lace back sweater was calling my name! It was one of those moments when I saw something and had to make it immediately. And I’m going to walk you through how you can make your own lace back sweater. A little background…

It all started with my mailbox. For an unknown odd reason, the Athleta catalog gets mailed to me. 99.9% of the time, I finish thumbing through in the time it takes to walk inside from my mailbox, but this time I totally got stuck on this picture of their Roamer Sweatshirt:
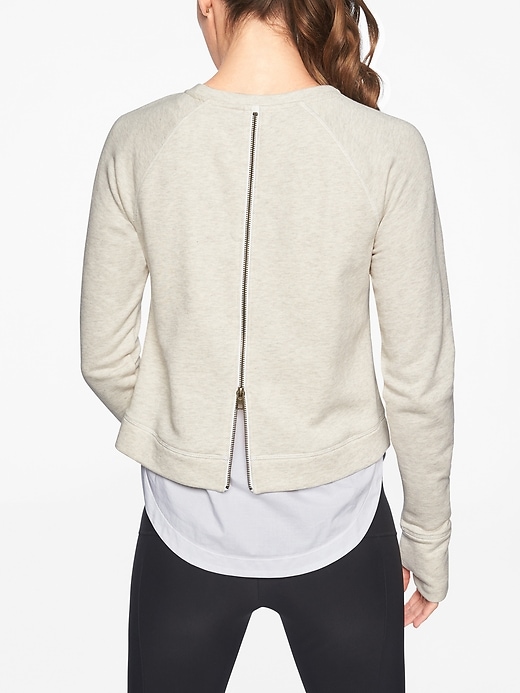
Could I make this? You bet.
Table of Contents
Lace back sweater: lace + zippers =fun
What you need
- Your favorite raglan t-shirt or sweater pattern (I’m using the Sew House Seven Toaster Sweater)
- 1 zipper
- Stretch lace or another contrast fabric
Fabric

To start this hack, I pulled out a white French terry from my stash. I’ve never known what to do with this fabric. It has a great stable hand, but it’s so white! While I generally believe that plain fabric is a blank canvas, I restrained myself and opted to pair the French terry with lace I reclaimed from a thrifted sweater. I’m a sucker for cream lace, and this one was way nicer than a thrifted sweater has the right to be!
Toaster + length -hem band

The original Toaster Sweater #1 is cropped and has a hem band. For this hack, you need to eliminate the hem band. To do so, simply measure the hem band and add the length to both the front and back pieces. But also, you need to add additional length to take out that cropped style. How much length you add will depend on your particular torso length.
Zipper back

The first part of this hack involves creating the zipper in the back piece. Stabilize the zipper area with fusible interfacing.
Next, add an exposed zipper treatment right at center back. Make sure to sew the zipper in upside down.
Then you need to hem the back piece before adding the lace piece. This is because the two layers will be sewn as one, so there’s no opportunity for hemming later on without ugly unpicking.
Lace underlayer
For the next part of the hack, you cut a layer of lace with an additional curved hem. To get the additional curved part, I simply added on 5″ at CB that curves back to the side seam. I used a French curve to make a nice clean curve. The lace layer is then basted to the back. From there you treat it as one.
Since I was reclaiming yardage from a sweater, I actually had to piece the back. I ran a line of Steam a Seam to fuse a the curved hem addition to the back. A row of stitching on my coverstitch makes for an almost imperceptible flat seam. I love piecing knits like this because there is no bulk.
At this point, baste the lace back to the zipper back. The back is ready to go! On to the front:
Front piece

The front is a bit of a fake-out. Instead of a full double layer with the lace, there’s only the curved hem piece of lace on the front. Make a similar curved piece addition, this time just 4″ at CF curving back to the side seams using the French curve.
Overlap the French terry and the lace by 1/4″ (again, Steam a Seam is a great tool here) and stitch in place. I used my coverstitch again here, though a standard zigzag would work just fine too.
Finishing touches

From there, you construct the sweater as the instructions would have you do. I used the ribbing on the sweater as a neck binding instead of the binding piece, so mine is narrower. The hem ribbing from the sweater is a hem facing for the lace.
Extra cuffs

This is not part of the Athleta look, but I wanted to add some fancy cuffs that highlighted the beauty of the lace. For my cuffs, I made a little tulip shape by extending the sides so that they curve upwards on 1 side. For each cuff, I cut a piece of French terry and the lace without its lining that was in the sweater body.
To sew them, I put right sides together and stitched the curved ends. Then you overlap the ends so to fit the circumference of the sleeve and baste together the layers. To finish them, you stitch the cuffs to the sleeves in the round. I added non-functional buttons because they’re pretty.
Last applique

I hate seeing good lace go to waste, so I cut out a large motif from the scraps of the leftover lace. It is simply stitched over one of the shoulders with a narrow zigzag.
Sporty girly
I think the Athleta top has that kind of urban cool, I just came from the gym and am going out for sushi in my track shoes kind of look that I will never achieve/be interested in. Dude, my hair doesn’t do that perfect voluminous ponytail. Instead, I had a great time reinterpreting this style into the more sporty ultra look that’s part of my everyday Mom look.

How do you reinterpret fashion looks to fit your lifestyle?


Elizabeth Farr is the writer behind the Elizabeth Made This blog where she shares helpful sewing tips, step by step sewing tutorials and videos to help you explore your creativity through sewing. She has written sewing Eguides and patterns, been a featured teacher at Rebecca Page’s Sewing Summit and Jennifer Maker’s Holiday Maker Fest and her work has appeared in Seamwork and Altered Couture magazines. She also created a line of refashioned garments for SEWN Denver. When her sewing machine isn’t humming, she’s playing and teaching violin, and hanging around a good strategic board game with her husband and 4 kids.
Elizabeth you are a STAR! I just LOVE your refashioning of a Toaster – what can I say? My favourite pattern, lace, curved hem, fancy cuffs – this is a dream of a top and what an inspiration you are! To the moon beautiful, creative, AND comfortable?! I’m going to keep my eyes out for lace in my favourite thrift shops now because this is probably the only way I could imagine myself wearing lace 🙂 Thank you for this post – it was a joy to read and see.
Thank you Kathleen! I knew since I was putting up a refashion post, I’d hope you’d pop up! I hope you find some pretty lace. There’s so many different amazing laces out there and you just have to find the one that you really love and go for it!
Great hack, Elizabeth! And, I love YOUR sporty ultra Mom look–great outfit with the scarf and boots! I really like the color combinations. I have a question: have you had luck dying lace? I need some rust-colored lace to use in the collar of a blouse and not sure where to find some and I know you dye fabrics, which I’ve not done yet….but, I also know most lace is a synthetic and not easily dyeable–any tips? thanks!
Thank you Heather! If you’re using a 100% cotton lace, you’ll have no problem dyeing the lace, but more likely you’re dealing with some kind of synthetic, in which case you’ll need to use a dye specially formulated for synthetic fabrics. I’ve been using Rit DyeMore a lot lately, and I’ve been really impressed with the results. It’s easy to use and you can mix the colors without any trouble. I know there’s also IDye Poly and Dharma Trading Co has some industrial polyester dyes as well. The biggest trick with dyeing synthetics is that the water has to be practically boiling. If the water is too cold, it won’t soak into the fabric at all–you will literally watch the color roll right off the fabric. I have a dedicated stock pot for nefarious crafting purposes and for small projects or swatches, I just use a tiny bit of water and dye in a small baking loaf pan (also dye only 😉 ). Good luck with your dyeing project. Definitely make some swatches so you know what you’re getting into!
That Elizabeth is a work of art! Love the cuff!
Thank you Faye! That lace was calling to me–they had to be cuffs!
This is such a great hack job. Your sweater looks absolutely beautiful.
Thank you Olivia! I love it when you can make what you have in your head!
Love the changes you made ! Inspiring!
Thank you Georgia! It was fun to adapt the style to suit my aesthetic. I’m not a activewear wear lady!
What an interresting hack. The zippered back with the lace is so beautiful. Chapeau.
Thank you Sonja! I couldn’t pass up the chance to go for this one when I saw the zippered back. That I had the lace in my stash was fortuitous!
Yours is so much cooler than the Athleta catalog version! Those cuffs are amazing. This style fits you so well!
Aw, thank you Ann! It is definitely my aesthetic, and I had such a good time with the construction. Lace is one of my favorite types of fabric to work with!
Love this top and your use of the lace – fabulous!
Thanks so much Tomasa! It was a fun challenge and I’m glad it worked out just like I hoped!
Nice touch! Thank you for showing details. Your top looks stunning on you and fits you well!