

I’m pulling out all my best thoughts about how to topstitch. By the end of this, you’re going to want to topstitch all the things.
Topstitching is one of those sewing tasks that can make or break a sewing project. Do it well, and those jeans looks better than designer. But if your topstitching looks more like a wandering path than an ultra crisp straight line, it’s going to be frustrating.
In this article we’ll talk about what topstitching is, tips and tools that will help you topstitch better, and my own hack for making topstitching with any color thread. Onward!

Table of Contents
What is topstitching anyway?
Topstitching is decorative stitching on the right side of the fabric. It’s usually a straight line stitch, often with thicker threads.
It can be purely decorative, but it usually has at least some functional purpose. On thicker fabrics like denim, it can be used to flatten seam allowances on the inside of the fabric. Done well, topstitching adds a crisp polished look to any project.

topstitching on boiled wool 
topstitching for a quilted knee patch 
topstitching on zippered welt


Look for topstitching on necklines to tack down facings, jeans, zippers, belts, waistbands, pockets and handbags.
How to topstitch better with specialized machine feet
Topstitching well requires a lot of practice. One way you can get practice topstitching and do it well right from the start is to use specialized sewing machine feet.

The best sewing machine feet for topstitching have a little blade on the bottom of them. The blade runs on the side of a seam, so every stitch is evenly spaced away from the seam.
As you stitch, you allow the blade to run on top of a seam, and the foot stitches some distance away from the seam.
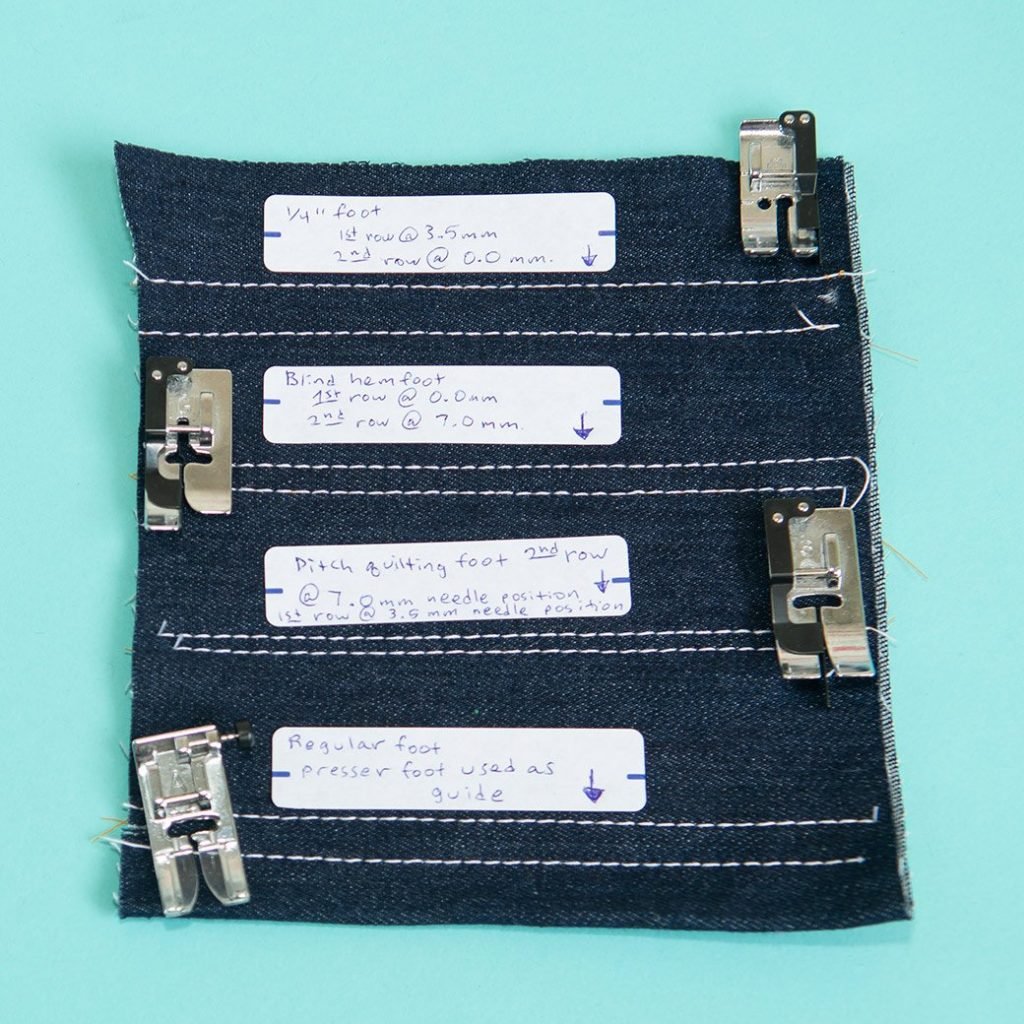
There’s several different feet that have this kind of feature, but here are my favorites:
- 1/4″ foot: common for quilters but very useful for topstitching too!
- Blind hem foot
- Ditch quilting foot
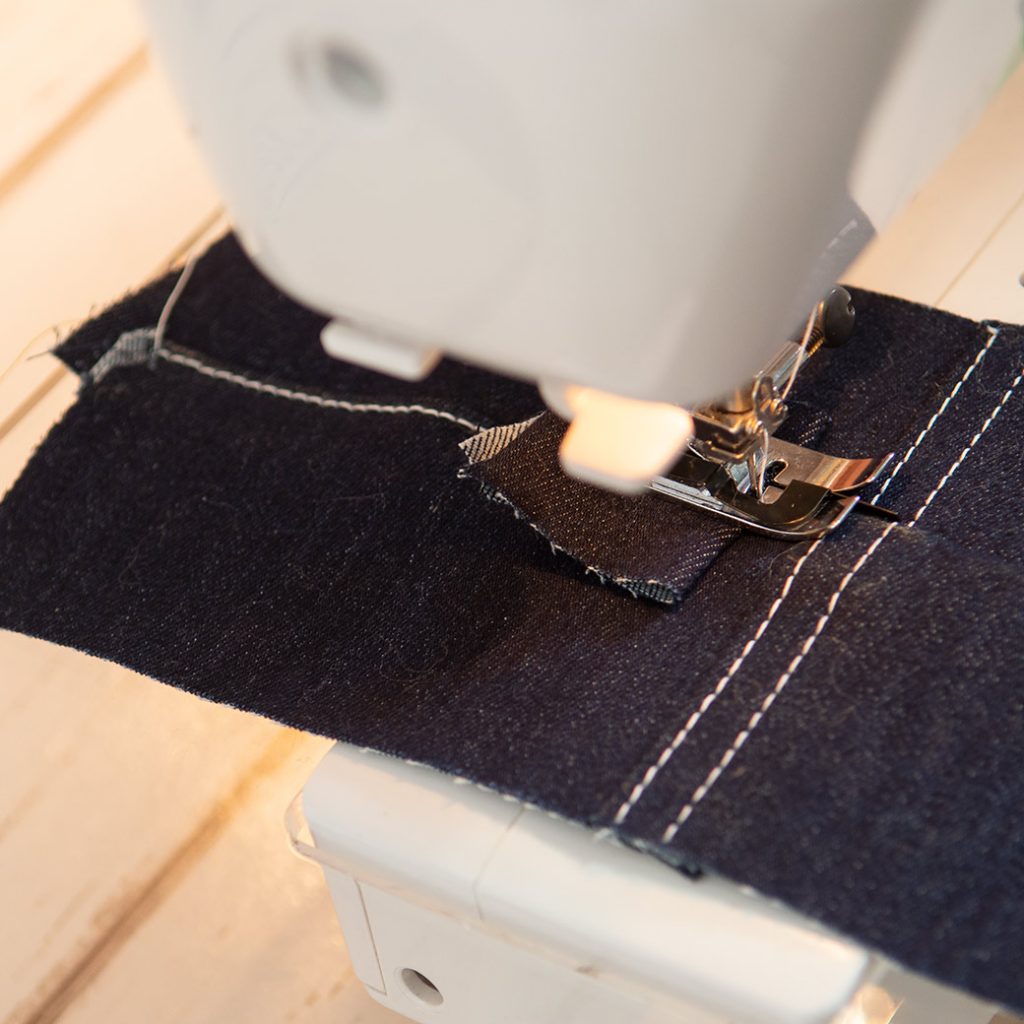
How to topstitch with topstitching feet
To topstitch with these bladed feet, first sew a seam.
After you do this, pop on one of the feet. The standard needle position will work for all of these feet. Do a test though and see if you like how far a given foot stitches away from the seam.
If you want to change the width of the space between the seam and the topstitching, move your needle to the right or the left.
Here’s what the default settings look like for each of the feet + an adjusted setting to give you an idea.
Tips to level up your topstitching game
Topstitch on paper
Often taught to beginning sewists, sewing on lined paper can help train your hands and eyes to sew straighter.

Since topstitching is all about consistency, this practice can serve you well here!
Grab a piece of notebook paper and sew rows right on the printed lines.
When your lines are looking good, draw a few curves and practice going along them as well.
Practice on scraps
Scraps are amazing for so many things, and practicing a good topstitch is one of them!
Grab a scrap of the fabric you’re working on. Next, stitch rows of topstitching. You can use a practice session to do things like:
- Decide how wide you want rows of topstitching to be
- What color of thread looks best on your fabric
- What length of stitch looks best
- Test out a decorative stitch vs. a straight stitch
- Double check thread tension
If you mess up a scrap, who cares? You’ll be able to make all the decisions and adjustments you need before you wreck your good fabric!
Watch your tension
Topstitching threads can wreak havoc on your sewing machine’s tension because of the thickness.
Use a scrap to test the tension to see if it’s balanced. Good tension means that you see only the top thread on the right side and the bobbin thread on the wrong side.
Before you get into adjusting every setting on your machine, rethread. Sometimes topstitching threads don’t get properly down into the tension discs. Simply rethreading can often stop a problem before it starts.
from wrong side: loops of top thread make a mess with lower tension loops of bobbin thread appear on the right side the higher the tension


If the tension is too tight on the top thread, you’ll see the bobbin thread on the right side. Fix this by going to a lower number on your top thread’s tension.
If the tension is too loose on the top thread, you’ll see the top thread on the wrong side. On the extreme side, it’ll make big nasty loops on the wrong side. Fix this by going to a higher number on your top tension.
Bobbin tension is another matter. Usually adjusting the bobbin tension involves tightening or loosening the screw. I personally don’t mess with this and leave that one to my repair guy. You can always refer to your sewing machine manual if nothing seems to be working.
Test out different thread
I talked about this a little bit, but definitely test out different thread. This is great for choosing the best color for your fabric. You can also use a thread test to try different brands of topstitching thread.
For a long time I thought that my machine hated Gutermann topstitching thread. Every time I tried to use it, the thread would shred on me. Not so much with Coats & Clark which has always given me excellent results.

bottom row: Coats & Clark Dual Duty Plus, Gutermann topstitching
What I discovered was that my machine sews with the thicker Gutermann just fine. My needle threader is the issue. If I use the needle threader with this type of thread, the thread gets split in two. Threading by hand and balancing the tension and the thread is perfect!
Here’s some good options for topstitching threads:
| Coats & Clark Dual Duty Heavy | good medium weight topstitching thread |
| Coats and Clark Dual Duty Plus | made specially for jeans, in traditional jeans topstitching colors |
| Gutermann topstitching | heavier thread that’s best on heavier threads like jeans. It only comes in 33 yard spools, so for an average pair of jeans, you’ll need 2 spools. |
| Mettler’s silk finish cotton | Beautiful thread that’s excellent for lighter weight topstitching. Plus it comes in umpteen million colors. |
Prevent skipped stitches when you topstitch
Topstitching stitches can skip when you get to thicker areas of a project. This could be any spot where you have two sets of seams that are crossing or if you’re working with grumpier fabrics like leather.
Using the button on your presser foot
On my Janome, my all-purpose foot has a little black button on the right side of the needle. Here’s how this button comes into play to prevent skipped stitches:
stop sewing lift the presser foot and press the button at the same time the foot is level now and you can keep stitching


When you get a few stitches before a thicker area, stop stitching. You can keep your needle down or up here. Next raise the presser foot and push in the black button at the same time. The foot will level out so that the stitches remain even.
If you feel some resistance or the machine won’t advance when you get to one of those spots here’s what you can do. Stop stitching, then raise the presser foot and gently pull the fabric behind the machine. When I say gently, I mean it. You don’t want the fabric to move more than a millimeter or so. After that the machine should advance.
Use a piece of folded fabric
My favorite way to prevent skipped stitches is with a piece of folded fabric. Instead of relying on the presser foot button, fold a scrap of the fabric you’re using to match the thickness of the fabric. Lift the presser foot and place the folded fabric under the back of the presser foot.
You can also use the fabric on the side of the presser foot to help level it out and prevent skipped stitches. This is my favorite tactic for sewing with leather.

Get more tips for sewing with leather.
What to skip for skipped topstitching stitches
There’s a commercial product called a jean-a-ma-jig that works the same way. It’s a piece of hard plastic and you use it just like the fabric chunk. I gotta say, it’s not worth the $4 because it is only 1 thickness.
You can always perfectly adjust the thickness on fabric by folding your scrap as many times as you want.
Knot your topstitching ends
Never backstitch with topstitching thread. It’ll make a mess on the backside of your sewing.
In most cases, any topstitching is going to be crossed by another seam that’ll anchor the thread in place.
If you’re working on a spot that won’t be crossed with another seam, bring the topstitching thread to the wrong side. You can gently pull on the bobbin thread to bring a loop of the top thread to the back, or use a hand needle.
Either way, make a good square knot with your bobbin and top thread. This is a nice clean look on jeans back pockets especially!
Pick the right needle
elizabethmadethis.com is a participant in the Amazon Services LLC Associates Program, an affiliate advertising program designed to provide a way for websites to earn advertising revenues by advertising and linking toSome of the links below are affiliate links. This means that, at zero cost to you, I will earn an affiliate commission if you click through the link and finalize a purchase.
The heavier your fabric, the heavier your needle needs to be for the best topstitching. The bigger the needle number, the heavier the needle is.

You can get good results topstitching with several types of needles. There’s universals, topstitching needles, leather and denim, and microtex. Use a reference like Sandra Betzina’s Fabric Savvy to see what needle is recommended for which needle, and test everything!

If you’re using a heavier needle, you can also use a heavier thread. Check back to the thread section for recommendations.
Lengthen your stitch
Thicker threads need more space to sit pretty, so lengthen that stitch.
Quick, check the pair of jeans closest to you to see if there’s any bunched up short stitches.
Spoilers, you won’t find any! What you will find are nice longer stitches.
A good length for most topstitching is 3.0-3.5mm, but you can go longer on thicker fabrics. I feel like a broken record here, but test it out and see what you like.
Make topstitching your own with decorative stitches
While straight stitching is de rigeur for topstitching, play around with alternate stitches.
pocket topstitching on jersey zigzag + straight stitches on linen/rayon


Zigzags, stars and other decorative stitches can give your topstitched project a totally different look and serve the same purpose.
How to topstitch on knits
Topstitching on knits is a little bit different.
Because knits have stretch built into them, straight stitches can pop under tension.
When you topstitch on knits, be sure to pick a stitch that has some stretch built into it. Your best choices here: double needle, narrow zigzag and coverstitching.
Read more about picking the best stitches for knits (no serger required!).
That’s all the tips for how to topstitch like a boss. Read on for how to topstitch jeans with some untraditional threads…

Elizabeth Farr is the writer behind the Elizabeth Made This blog where she shares helpful sewing tips, step by step sewing tutorials and videos to help you explore your creativity through sewing. She has written sewing Eguides and patterns, been a featured teacher at Rebecca Page’s Sewing Summit and Jennifer Maker’s Holiday Maker Fest and her work has appeared in Seamwork and Altered Couture magazines. She also created a line of refashioned garments for SEWN Denver. When her sewing machine isn’t humming, she’s playing and teaching violin, and hanging around a good strategic board game with her husband and 4 kids.
The last 2 jeans-ish projects I made involved regular thread and triple stitching. I made some skinny jeans for myself and opted for grey topstitching to complement the denim, which had a metallic silver sheen to it. And I also made a denim baby romper with green topstitching to go with a dinosaur applique on it. It really does open up a lot of creative doors! I hadn’t thought of blending the colors with two different threads, though, so thank you for the tip. And I like the example you have above with the decorative border waistband.
Once you start, you start seeing the possibilities!
Pingback: Deconstructed silk scarf jeans - Elizabeth Made This
Pingback: Corduroy Pencil Skirt - Elizabeth Made This
Pingback: Sea Glass Denim Jacket - Elizabeth Made This
Thank you for posting this, reading all your tips made me feel like I had a big sister showing me how to sew rather than generic internet tutorials. Much appreciated!