


Table of Contents
Skirt refashion: sewing process
Make apron straps
Stack 2 apron strap pieces right sides together (1 cut from the skirt, the other from lining).

Stitch around the strap with a 3/8″ seam allowance. Leave the narrower end unstitched.
Repeat for the second strap.
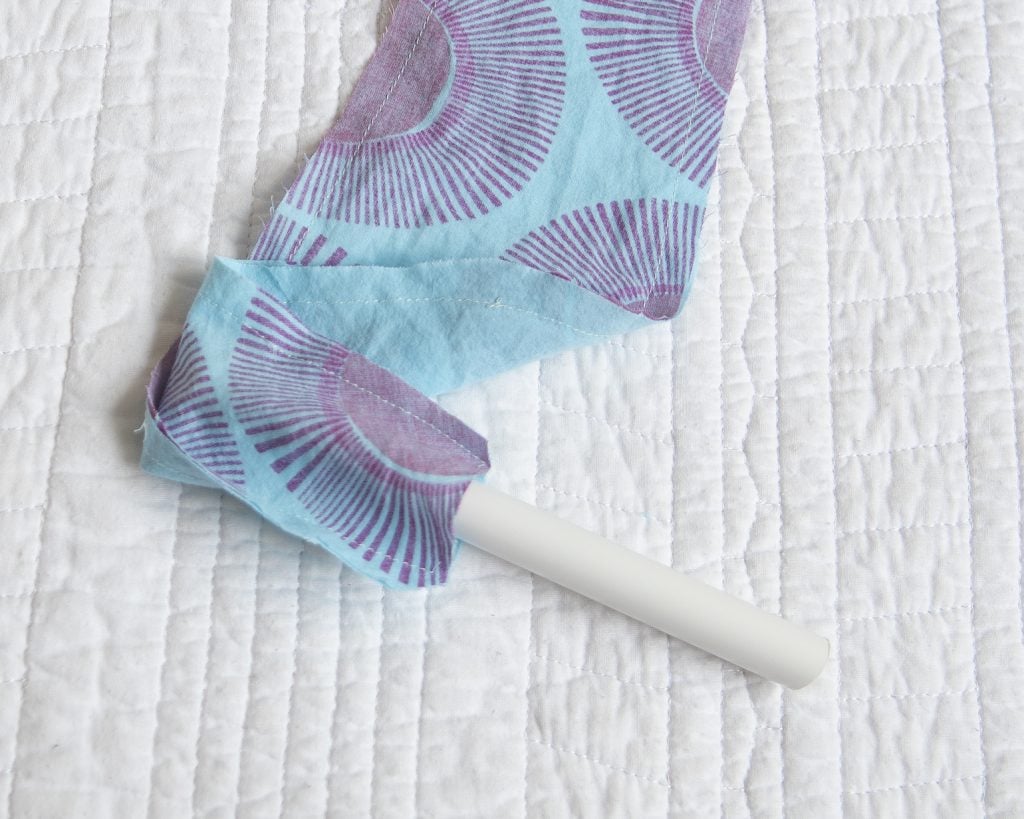
Turn the apron straps
Trim the corners at an angle.

Iron on a piece of fusible interfacing on the lining side on both straps.

At this point you can turn the straps by hand, but you’ll do much better with using some sort of tube turner. My favorite are these Turn-it-All Tubes (*affiliate link*). The Turn-it-All tubes make the top of my 11 helpful sewing tools list, and I’m proving it’s worth now!
Hover over the gallery pics for the next steps:


Topstitch the straps
Stitch all the way around the straps 1/8″ from the pressed edge.

Make the bib
Pin the straps to the outer bib right sides together. The top of the straps should be 3/4″ from the bib’s top edge.

Next, roll up the straps so that they’re out of the way.

Match the right side of the outer bib to right side of the bib lining. The straps will be sandwiched in between the bib pieces.
Then, stitch around the bib with a 3/8″ seam allowance. Make sure to leave a hole at the wider side of the bib for turning.
Turn the bib
Trim the corners of the bib.
Now, reach inside the hole you left at the bottom of the bib.


Turn the bib by pulling on the straps . Use a dowel to poke around the contours of the inside of the bib.

Press the bib, making sure that the seam allowance is turned towards the inside in the hole in the bottom of the bib.
Attach bib to skirt

Grab your skirt and the bib assembly. First, mark the center front of the skirt with a pin.
Overlap the skirt waistband on top of the bib by 1/2″, matching center front to center front. Pin in place.

To finish the bib, stitch around the top and bottom of the waistband and the sides of the bib where it’s attached to the skirt.

Add velcro to the straps

Cut your strips of velcro in half. Pin the wrong side of two hook pieces (the scratchy side) to the right side of the right strap.
Pin the wrong side of the two loop pieces (the soft side) to the lining side of the left strap.
Topstitch around both pieces of velcro on both straps.


Tada! Adjustable neck!
Make the apron ties

Take one of your tie pieces, and fold the right sides together the long ways.
Stitch around the short ends and the long side, leaving a hole for turning near the middle of the long side. Clip the corners.
Turn the tie with the tube turner just like you did for the straps earlier.
Press the tie, making sure that the seam allowance is turned towards the inside in the hole in the tie’s side.
Topstitch all around the outside of the tie 1/8″ from all edges.

Repeat for the second apron tie.
Hem the skirt sides

Press the raw edge of the skirt outside 5/8″ towards the wrong side.
Match the side seams of the lining to the side seams of the skirt.
Fold the pressed edge towards the inside until the lining’s edge is covered by the pressed hem. For me that was an extra 1 1/2″. The idea is to make sure any snaggly edges of the lining are covered over by the side hem.

Press the hem in place after this second turn to cover the lining.
Stitch from the top of the skirt down to the bottom close to the pressed edge to finish the side.
Repeat for the second side of the skirt.
Stitch the ties to the skirt
Your skirt refashion is almost done and your new apron is nearly finished.
All that’s left is to stitch the ties to the skirt.

Take one of the ties and pin it to the top edge of the skirt on the wrong side. The tie should just cover the width of the hem.

Stitch the tie to the skirt. You can stitch around the tie with a plain rectangle or add an X in the center of the rectangle for added strength.
Repeat for tie #2.
And you’re done!
Finding new life for old clothes
So in the process of this skirt refashion, the skirt is no more, but now you’ve made something totally new. And that’s what refashioning is at it’s heart–finding something old and re-imagining it so that it becomes something that will be used again.
For more refashioning inspiration, check out 6 steps to a great thrift store refashion. For more projects like this one plus 12 step by step tutorials, check out my Eguide Easy Refashions for Every Season.
Let me know if you sew this one up. I can’t wait to see what skirt aprons you come up with!

Elizabeth Farr is the writer behind the Elizabeth Made This blog where she shares helpful sewing tips, step by step sewing tutorials and videos to help you explore your creativity through sewing. She has written sewing Eguides and patterns, been a featured teacher at Rebecca Page’s Sewing Summit and Jennifer Maker’s Holiday Maker Fest and her work has appeared in Seamwork and Altered Couture magazines. She also created a line of refashioned garments for SEWN Denver. When her sewing machine isn’t humming, she’s playing and teaching violin, and hanging around a good strategic board game with her husband and 4 kids.
I would really appreciate the pattern for the Apron Refashioned from a skirt please. I have already subscribed to your newsletter but didn’t receive the pattern I requested. Many thanks. Paula.
Let me check on my email provider. Thanks for letting me know Paula. It’ll be coming your way shortly!
Hello!
I haven’t received the apron pattern despite signing up for newsletter. I have the perfect skirt to repurpose!
Cindi
Hi Cindi! I will pop into my email client and get that sent your way straight away! Can’t wait to see how your skirt apron turns out!
I got it! Thank you. 😀