

Table of Contents
Sewing on the pockets

Press the side seams of the bag in one direction. Turn the backpack towards the right side.

Fold the sides of the pocket pieces together and lightly press the vertical center of the pockets.

Line up that center fold of a pocket with one of the side seams. Pin the sides in place. Next, sew the sides of pocket to your backpack close to the pressed edge. Backstitch at the top of each pocket side.
Pin the second pocket in place and stitch the sides just as you did with the first one. Almost done!
Finishing the sewing

Fold one of the loops in half and pin it 3/4″ from the side seam on the bottom front side of the bag. Baste the loop in place.
Repeat with the second loop, folding it in half and basting it 3/4″ from the second side seam.

To finish up, fold the backpack right sides together and sew the bottom seam with a 1/2″ seam allowance. Finish the seam allowance and turn the backpack towards the right side. Give the backpack a good press on the edges.
Now it’s time to add the drawstring.
Threading the drawstring backpack
This is a little weird, but it’ll make sense as you’re doing it. Definitely this step is a lot clearer to see on the video. The threading happens about at 8’45”.

First, pass one end of the paracord through one of the bottom loops. I’m starting on the left side.


You can adjust the length to fit your child at this point. Cut off any extra cord. Melt the cut with a lighter so the cord doesn’t fray, then tie a little simple knot at the each end.

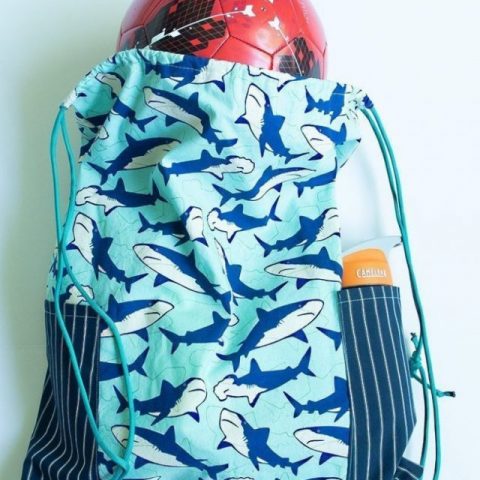
And that’s how to make a drawstring backpack. This DIY drawstring bag is a great all-purpose kid-friendly hauler of stuff. I could see them holding stuffed animals and a change of clothes for sleepovers or for going swimming.
If you make up one with this tutorial, I’d love to hear about it!
How to make a drawstring backpack (great for beginners!)
If you have kids in sports, you needed this easy DIY drawstring backpack like yesterday. Sew your own with this sewing tutorial and survive soccer season! Even if you're just getting started sewing, you'll love how easy it is to make a simple drawstring backpack for your kids' sports gear, the pool, sleepover essentials and more.
Materials
- 5/8 yard cotton quilting fabric
- 3.5 yards paracord (you can find it in most craft stores) or other thin sturdy cord
- 1/3 yard contrast fabric
Tools
- loop turner
- elastic threader
Instructions
- Grab your pocket pieces, and fold 1/2" towards the wrong side of the short straight top edge. Press the fold, then press back 1/2" more towards the wrong side.You'll need the DIY Drawstring Backpack pattern for this project. Sign up in the box above to get the pattern. When you have the pattern, print it out. Line up the symbols and tape where indicated.
- Cut 2 pockets, 2 bag pieces and 2 loop pieces from your choice of cotton fabric.
- Next press the top raw edge of the bag pieces 1/4" towards the wrong side. You can finish the edge with a zigzag stitch or serger first if you like.
- After that, press 1/2" more towards the wrong side. (3/4" for total hem of the casing).
- Make a 1/2" clip 1 1/2" down from the top raw edge of bag pieces. Fold the edge of the clipped edge inwards twice to make a small hem. Repeat on the other 3 sides of the top pieces.
- Stitch the casing sides from the top to the bottom where the clip is. Make sure to backstitch right at the clip along the hem. Sew the other 3 short sides of the casing.
- Fold the pressed hems back towards the wrong side and stitch from the wrong side close to the pressed edge. Hem the casing on your second backpack piece.
- Fold the pressed hems back towards the wrong side and stitch from the wrong side close to the pressed edge. Hem the casing on your second backpack piece.
- Grab your pocket pieces, and fold 1/2" towards the wrong side of the short straight top edge. Press the fold, then press back 1/2" more towards the wrong side.
- Stitch the top hem down close to the pressed edge. Repeat for pocket #2.
- Press the angled sides of the pockets 1/2" towards the wrong side.
- Fold the short ends of the loops in half, right sides together. Stitch down the longer sides of the loops with a 1/4" seam allowance.
- Use your loop turner to turn the loops right side out. Roll the loops in your fingers so that the seam is in the middle of the loop.
- Sew the side seams of the DIY drawstring backpack with a 1/2" seam allowance, starting from the bottom of the bag going up towards the edge of the casing. Finish the seams and press.
- Fold the sides of the pocket pieces together and lightly press the vertical center of the pockets.
- Line up that center fold of a pocket with one of the side seams. Pin the sides in place. Next, sew the sides of pocket to your backpack close to the pressed edge.
- Fold one of the loops in half and pin it 3/4" from the side seam on the bottom front side of the bag. Baste the loop in place.
- To finish up, fold the backpack right sides together and sew the bottom seam with a 1/2" seam allowance.
- Time to thread the your DIY drawstring backpack. Click the link to watch the video at about 8'45" for a clear look at the threading process. Adjust the drawstring length to fit your child, then use a lighter to melt the ends. Tie the ends in strong square knots.
- Voila! And that's how to make a drawstring backpack. Go try this, you will make your kids so happy with this project!
Recommended Products
As an Amazon Associate and member of other affiliate programs, I earn from qualifying purchases.


Looking for more easy sewing projects? Try these:

7 minute DIY Zipper Bag
Oh how I love the 7 minute DIY zipper bag! So many awesome things: #1…

How to sew a DIY felt garland that’ll welcome the snow
Today we’re talking all about how to sew a DIY felt garland with some serious…

Quick project: make this easy felt ornament
Need a quick last minute Christmas project to sew? This easy felt ornament is for…

Elizabeth Farr is the writer behind the Elizabeth Made This blog where she shares helpful sewing tips, step by step sewing tutorials and videos to help you explore your creativity through sewing. She has written sewing Eguides and patterns, been a featured teacher at Rebecca Page’s Sewing Summit and Jennifer Maker’s Holiday Maker Fest and her work has appeared in Seamwork and Altered Couture magazines. She also created a line of refashioned garments for SEWN Denver. When her sewing machine isn’t humming, she’s playing and teaching violin, and hanging around a good strategic board game with her husband and 4 kids.
Definitely a practical item, it’s going to get a lot of use! Wish I had thought of that when my kids were in soccer!
Thanks Linda! Any bit of organization when it comes to kids sports is a win!
You make it look so easy! Thanks for sharing!
You’re so welcome Patricia!
There are two places in the tutorial that you say put the backpack pieces wrong sides together to sew the side seams – I’m assuming you mean put the right sides together? The pictures show the fabric right sides together.
Yes, you are correct. It’s all fixed now. Thanks for the eagle eye!
How do we get the pattern?
It’s in the Resource Library which you can access when you sign up for the newsletter. Hope that helps!
Hi Elizabeth,
I printed out the pattern; however, I don’t know how to figure the size to cut the fabric per pattern piece. I’m new to sewing by pattern.
I’m excited to sew this for my soccer granddaughter!
Thanks much,
DIana Cokeley
Can you guide me to your tutorial – brand new sewer here! I signed up and have the pattern for the drawstring bag but would love to see your tutorial.
Keep reading down in the post for the full tutorial, and there is a video tutorial in the post as well.
I’m trying to get this pattern and I’ve signed up for the newsletter multiple times but the email never comes through.
When you sign up there is an email that will send you a password for the resource library. The pattern is in the resource library and will not come to you via email.
I signed up for the newsletter, and never got an email for the password for the resource library
Send me an email: elizabethmadethis at gmail dot com