

Every time I come across a shrunken sweater, I simultaneously die a little and do a happy dance.
See, a sweater that gets destroyed in the wash is a little ball of upcycle potential. There’s so many things you can make with cast off sweaters from sweater hats to fingerless gloves, and even sweater shrugs.
One of my favorite ways to revive a sweater is to make a scrap scarf like this. I’ll show you how to take old sweaters and transform them into 3 simple scarves with just circles. This is a great little project for any weird bits of warmer knits you might need to use up, and you can even do this with polar fleece for a different but also very toasty scarf.
On to using up those scraps.

elizabethmadethis.com is a participant in the Amazon Services LLC Associates Program, an affiliate advertising program designed to provide a way for websites to earn advertising revenues by advertising and linking toSome of the links below are affiliate links. This means that, at zero cost to you, I will earn an affiliate commission if you click through the link and finalize a purchase.
Best fabrics to use for a scrap scarf
Felted sweaters are a great choice for a scrap scarf. The fabric is shrunken and sometimes stretched out of shape, but that tightening of the fibers will make for a really warm scarf.
Keep an eye out for 100% wool or wool blend sweaters. They’re one of my favorite sewing supplies at thrift stores I’m always hunting. If you like the color, just get it. I know my local thrift store yearly has a 99 cent sweater sale in January, and there’s always good sweater knits to be found!
Even better than wool and wool blend is cashmere and merino. Both of them are softer and won’t irritate your skin like wool can. Cashmere is thrift store GOLD.
Polar fleece is another option for this project. Use a good quality fleece like Polartec 100 weight.
And if you can find it, boiled wool is a fantastic option. Boiled wool is wool that’s really already gone through the felting process. It makes great jackets, won’t fray and it has a beautiful weight to it.
To felt or not to felt your sweater?
If your wool sweater of choice is not felted, think about if you might want to do that. If the sweater is reasonably thick to begin with, I’d say go for it.
What kinds of sweaters will felt? Wool and wool varieties: wool, angora, cashmere, merino. Wool blends will also felt but they won’t shrink as dramatically as a 100% wool sweater.
Lighter weight warm knits like cashmere and merino I think are too pretty to felt, so maybe keep them as is. Then again if you felted a sweater from your closet by accident, work with what you got, friend.
If you do want to felt a sweater, wash it on hot and dry it on hot. The fibers will fluff up, tighten together to make a tight matrix that’ll be perfect for your scrap scarf.
Let’s get cutting.
Cutting your scraps
From your sweater(s), cut 72 circles with at least a 2.5″ diameter. I would highly recommend the Olfa circle rotary cutter here.
The Olfa circle rotary cutter works like a compass, cutting perfect circles outward from the center. I love how it helps you get clean edges as you cut. Since the edges on this scrap scarf are going to be left raw, that clean edge is everything. This little tool, unitasker though it is is one of my favorites precisely because it’s so good at what it does.
You can also use a jar lid as a template. Trace around your lid, then use scissors to cut all your circles.
If you’d like, cut more circles for a longer, more dramatic scarf.

boiled wool, cashmere, cotton sweater knits


My finished scarf measures about 45″ long. I cut mine from a combination of boiled wool, and leftovers from a cashmere sweater, and a cotton sweater.
Wandering scrap scarf

For the first version of this scrap scarf, stack two circles wrong sides together.

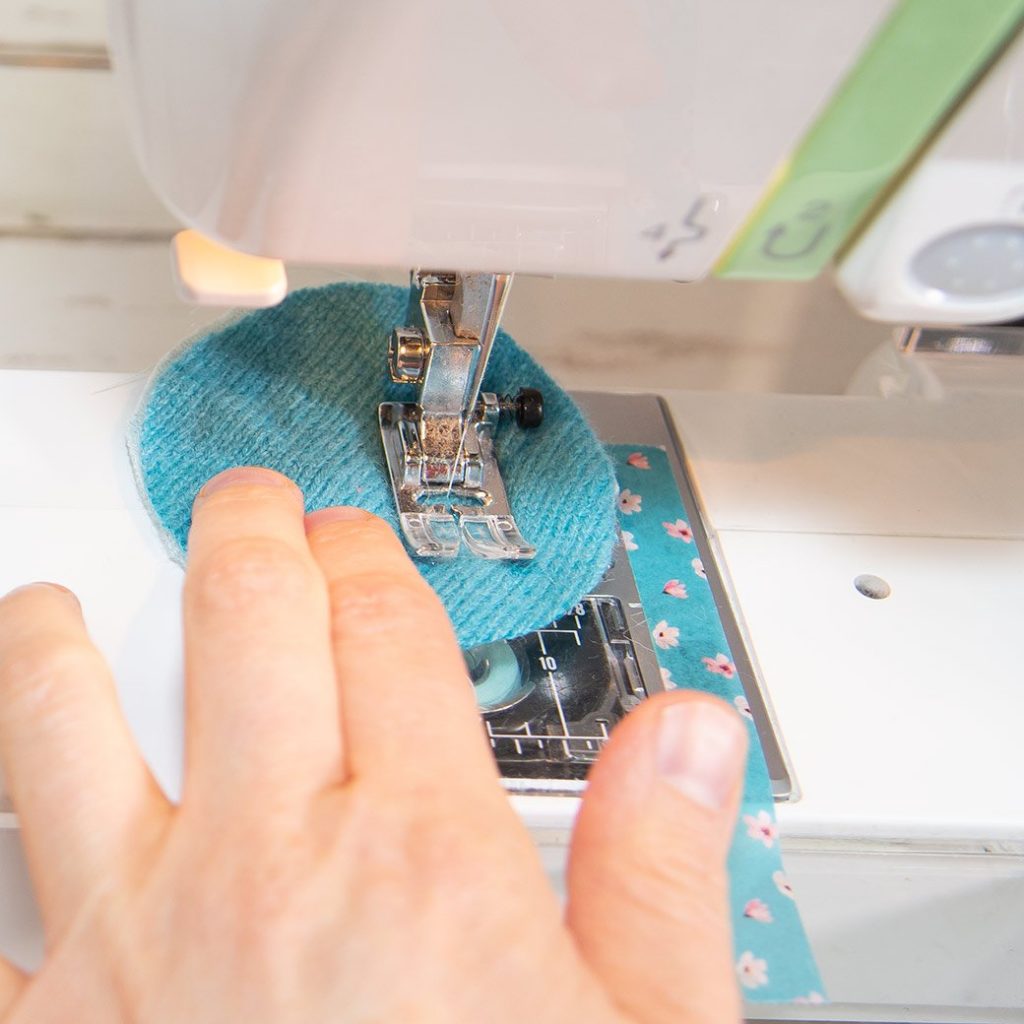
Take them to your machine and line up the side of the circles with a line 7/8″ to the right of your needle.
Use a piece of washi tape to mark this line. The tape will be our guide for this whole project.
Sewing the circles together into small sets
Next, stitch straight down through both circles backstitching at the beginning and end. Let that right edge of the circle that began was touching the tape travel along the washi tape towards the back to help keep your stitching straight.
sew first 2 circles together Add another circle starting at the intersection of the last pair of circles

After that, unfold the circles. Match another circle to the wrong side of one of the circles you just sewed. You can alternate colors or not. Line up the needle with the intersection of the first two circles. Stitch through both of these circles the same way you did the first pair.
Keep sewing circles together like this until you have a set of 6 circles. See how they make a cute little C-shaped bend in them? We’ll play with that in a second.

Make 12 full sets of 6 circles.
Joining the sets of circles
From here, you have a decision. You can join the sets of circles so that they’re all facing the same way, or you can alternate them.

scallop alternating for more wandering look


If they face the same way, they’ll look like a big repeating scallop pattern. If they alternate, they’re a little more serpentine. You decide what you like.
When you like your layout, join the free edges from two sets together, stitching straight down, lining up the edge of the circle with the washi tape.
Keep joining sets together until you’ve finished your scrap scarf.
And because I love theme and variations, here’s 2 more ways to combine your sweater scraps to make unique looks.
Chain scrap scarf

This one is easy! Sew pairs of circles together with a 1/2″ seam allowance. Again, make sure to sew straight down the circles. At the end, you’ll have one long chain scrap scarf.

Pinwheel scrap scarf
I love the drama of this one. Sew pairs of circles together just as you did for the wandering scarf, but make them in sets of 8. When you get to that 8th circle, join the last circle to the first circle.
pinwheel scarf!


It’ll make a perfect little pinwheel flower. Make 12 full pinwheels, then join their edges together to make a full scarf.
So there’s 3 different ways you can cut up old sweaters and transform them into scrap scarves. Here’s some other sweater refashion projects to try.

How to make a hat from a sweater
Make 1 or several from the same sweater!

Fix a shrunken sweater
Make your felted sweater into a cute cropped jacket

DIY fingerless gloves
Old sweaters have arms. Turn them into something toasty!

Elizabeth Farr is the writer behind the Elizabeth Made This blog where she shares helpful sewing tips, step by step sewing tutorials and videos to help you explore your creativity through sewing. She has written sewing Eguides and patterns, been a featured teacher at Rebecca Page’s Sewing Summit and Jennifer Maker’s Holiday Maker Fest and her work has appeared in Seamwork and Altered Couture magazines. She also created a line of refashioned garments for SEWN Denver. When her sewing machine isn’t humming, she’s playing and teaching violin, and hanging around a good strategic board game with her husband and 4 kids.
Wow, this is beautiful! I literally gasped when I saw it. Makes me want to try making one.
This is so pretty! I can’t believe you made this from a sweater. Awesome job!
Moving from California to Texas in high school, the mum thing was quite a culture shock. Thank you for reminding me about them!
Love the scarf–it does look very cozy for basement sewing and Fall weather.
It’s lovely, and it looks like it will go with a lot of different outfits! Isn’t refashioning great?
I really do love refashioning, but finding good fabric/garments to refashion is not an easy task for me. For now, it’s about a once a year happy accident that I come upon something really great at the thrift store that’ll work.
Wow, this looks awesom, much better than the pattern pictures. Win Win for sure !!
It’s gorgeous!
What a great idea to repurpose a sweater.
Beautiful scarf! Clever repurposing.