

I’m all about small purses. Maybe it’s the Mom in me who believes that if my bag is small, my kids can’t ask me to carry stuff.
So something like this DIY wristlet purse is totally up my alley.
I love the lightweight nature of these, and it’s a great place to use up fancy fabric scraps you might have hanging around.
I’ll show you how to make the basic DIY wrislet purse, then I’ll show you how to throw some glitter at it with an overlay of fabric yoyos.

Cutting out your pieces
Now it’s time to cut everything.
Cut two pieces measuring 8″X 5″ each of:
- outer fabric
- lining
- canvas
Next cut one strap measuring 2″X 16″ from your outer fabric.
Also cut one loop for the D-ring measuring 2″X 1.5″.
Save some scraps for zipper tabs as well. We’ll use them to cover up the raw ends of the zipper and make them look nicer.
On to the sewing.
Make the zipper tabs


Place a scrap right sides together with the right side of the zipper.
Stitch straight across the bottom just past the zipper stop.
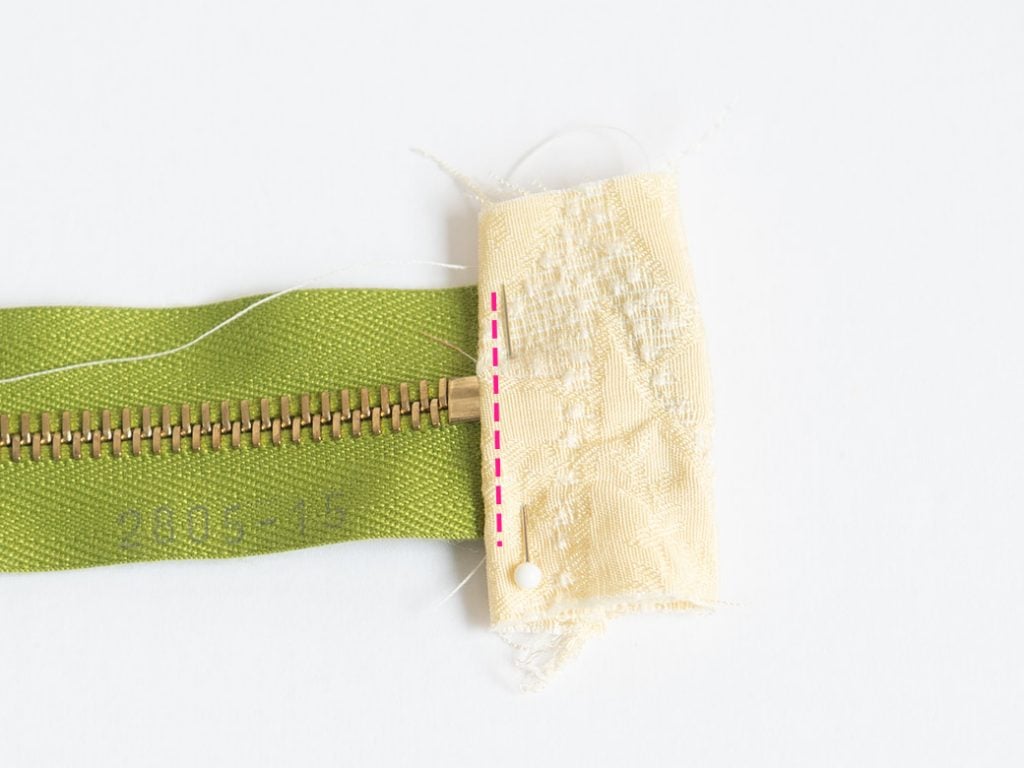
Next flip the fabric and press. Press the raw edge up by 3/8″. Then fold the fabric over on itself to enclose the zipper tape.
Pin the end of the zipper and stitch close to the edge. Stitch down close to the sides of the zipper with a basting stitch and trim away any extra fabric.
Make a second zipper tab the same way on the other side of the zipper. Set the zipper aside.
Make the loop for your DIY wrislet purse
The D-ring needs a loop!

Take your loop piece and fuse a 1″ wide piece of interfacing to the wrong side.
Fold the raw edges on the longer sides towards the middle. Press the pressed edges together so that they’re even.

Finish up the loop by stitching down the pressed edges. Set the loop aside.
Add interfacing to the outer bag
In this case, we’re using the canvas for interfacing on the outer bag. The canvas will give the bag some nice structure without making it feel too cardboardy.

Place a piece of canvas on the wrong side of your outer bag pieces. Baste around the rectangle. Repeat for the second outer bag piece.
Now thread the D-ring through the loop. Place the folded loop towards the inside of the bag near the top of one of the short sides.

Stitch back and forth across the loop close to the edge to secure it.
Sewing the bag
At this point, the bag goes together the exact same way as the 7-minute DIY zipper bag.
7 minute DIY zipper bag
A bag in 7 minutes? I kid you not. They’re super fast.

Go check out that tutorial, and I’ll see you back here to finish this bag off with the wristlet strap.
Making the wristlet strap
To finish off your DIY wristlet purse, it needs a strap.

Take your strap piece and fuse a piece of 1″ wide interfacing right down the center on the wrong side.
Press the raw edges on the long side towards the center so that they’re even with the interfacing.
Fold the pressed edges on themselves and press. Stitch down the long pressed edge just like you did for the loop.
Next thread the strap through the end of the swivel hook.
I actually salvaged this swivel hook from a worn-out bag. Old bags are good like that if you’re not sure where to find good hardware. They’re a top find on my list of sewing supplies at thrift stores that are worth seeking out!

Bring the ends of the strap together and sew straight across them with a 3/8″ seam allowance and a short stitch length. Backstitch at both ends.
Turn the strap through the hook so that the right sides are facing out. Bring the seam you just sewed up to the end of the swivel hook.

Stitch across the strap through all layers close to the end of the swivel hook, backstitching at both ends.
At this point, you have a perfectly cute DIY wristlet bag.

But of course I have another awesome but optional variation for you. Dare I say yoyo overlay? It’s a lot of easy hand sewing that’ll make a big impact.
How to make a yoyo overlay for your DIY wristlet bag.
elizabethmadethis.com is a participant in the Amazon Services LLC Associates Program, an affiliate advertising program designed to provide a way for websites to earn advertising revenues by advertising and linking toSome of the links below are affiliate links. This means that, at zero cost to you, I will earn an affiliate commission if you click through the link and finalize a purchase.
To make your yoyo overlay, you need to make 30 yoyos. Cut circles with a 3 cm radius. I find this easiest with the Olfa circle rotary cutter.


I’m cutting mine from silk taffeta, but just about any lightweight fabric works here.
From there, follow this tutorial for how to make a fabric yoyo. It’ll show you how to stitch up the yoyos and how to join them together. You’ll need 30 of these guys for this size bag.
Joining the yoyos
Stitch together 6 rows of 5 yoyos each.


Next, fold the right sides of the rows together and stitch the edges together. Be sure to follow the joining directions in the yoyo tutorial because it’s a little specific for yoyos, and a machine stitch will not be strong enough here.

When you have 6 rows of 5, fold the rows in half right sides together. Join the 3 yoyos on each side together with the joining stitches.
Flip the bag overlay right side out.
Adding the overlay to the bag
Now the fun part! Slip the wristlet inside the yoyo overlay. You’ll need to thread the D-ring through one of the holes between the yoyos on the side.

Thread a hand needle with a single thread and knot it.

Starting on one side of the top, sew a running stitch that moves between the wristlet and the overlay, only stitching though the backside of the yoyo and the top layer of the bag. If you do this right, you shouldn’t be able to see any stitches.

Keep close to the edge of each yoyo as you keep making your running stitches all around the top edge of the yoyo overlay. When you’re back to where you started, tie a knot, bury the tail in one of the yoyos and clip it.
Make it extra
We’ve already made this bag pretty extra with the added yoyo overlay. If you want to go further still, stitch on some buttons over the tops of the yoyos.

Since the buttons are just for decoration, you can get creative with some fancy stitching.
Make it plain or make it fancy, that’s how you can take some fabric scraps and whip out your own DIY wristlet bag.

Elizabeth Farr is the writer behind the Elizabeth Made This blog where she shares helpful sewing tips, step by step sewing tutorials and videos to help you explore your creativity through sewing. She has written sewing Eguides and patterns, been a featured teacher at Rebecca Page’s Sewing Summit and Jennifer Maker’s Holiday Maker Fest and her work has appeared in Seamwork and Altered Couture magazines. She also created a line of refashioned garments for SEWN Denver. When her sewing machine isn’t humming, she’s playing and teaching violin, and hanging around a good strategic board game with her husband and 4 kids.