


Today I’m going to show you how to sew your own raglan tee. Up to this point in my raglan t-shirt series I’ve showed you how to make your own DIY raglan sleeve tee pattern.
In case you’d rather use someone else’s pattern, I wrote about several different raglan tee patterns for everyone.
Whatever pattern path you’ve chosen, we’re going to break down raglan t-shirt construction step by step. Let’s sew a raglan top pronto.

elizabethmadethis.com is a participant in the Amazon Services LLC Associates Program, an affiliate advertising program designed to provide a way for websites to earn advertising revenues by advertising and linking toSome of the links below are affiliate links. This means that, at zero cost to you, I will earn an affiliate commission if you click through the link and finalize a purchase.
Table of Contents
What do you need to sew your own raglan tee?
A note on mixing knits when you go to sew your own raglan tee…
Before I show you how to sew a raglan sleeve tee, let’s talk a sec about mixing knits. So, with the classic raglan tee–you know, the iconic baseball tee, it’s pretty standard to make the sleeves and the body a different color.
The trick is, how do you pick knits that go well together? I’m not talking about colors, although you should think about that. I mean unless you’re into lime green plus mauve.
Fabric weight + stretch =happy raglans
No, what I’m talking about has to do with the weight and stretch of knits. The knits that go best together have similar weight and stretch.
Why is that? Well, let’s say you have an ITY knit and you tried to combine it with a ponte knit. ITY has crazy stretch and drape, while ponte is so stable it practically behaves like a woven fabric. You’ll have a bear of a time trying to pair the two of them. The ITY will probably get all kinds of sketchy gathers or you’ll end up stretching out the ponte to try to get it to play nice with the ITY. A great recipe for a bad sewing day.
What’s a better combo? Two knits with a similar or same fabric content. Two knits with a similar weight. Examples?: 2 rayon spandex solids. Or maybe 2 cotton spandex jersey prints. Also–2 stretch laces.
How to test 2 knits for compatibility
But Elizabeth, I buy lots of mystery fabric.
I do too! I love me some mystery fabric! So to test to see if your knits are going to play nice together, first cut a little rectangle of each.
On the tutorial video, you can see this test in action around minute 2:30.

And now let’s get sewing!
How to sew your own raglan tee
How to cut a raglan sleeve tee
So you’ve chosen your two contrasting knits. Grab your pattern pieces and cut out a front and back from your body fabric and 2 sleeves and a neckband from your contrast fabric.

Press first!

Fold your neckband in half the long ways and press it down the middle.

Also press up your hems on the front and back and the sleeves. You’ll thank yourself later for the added time you’ll save pressing the hems now.

For my hem, I’m using a 1 1/4″ hem on the front/back and 3/4″ on the sleeves. If you have different hem preferences, go with them!
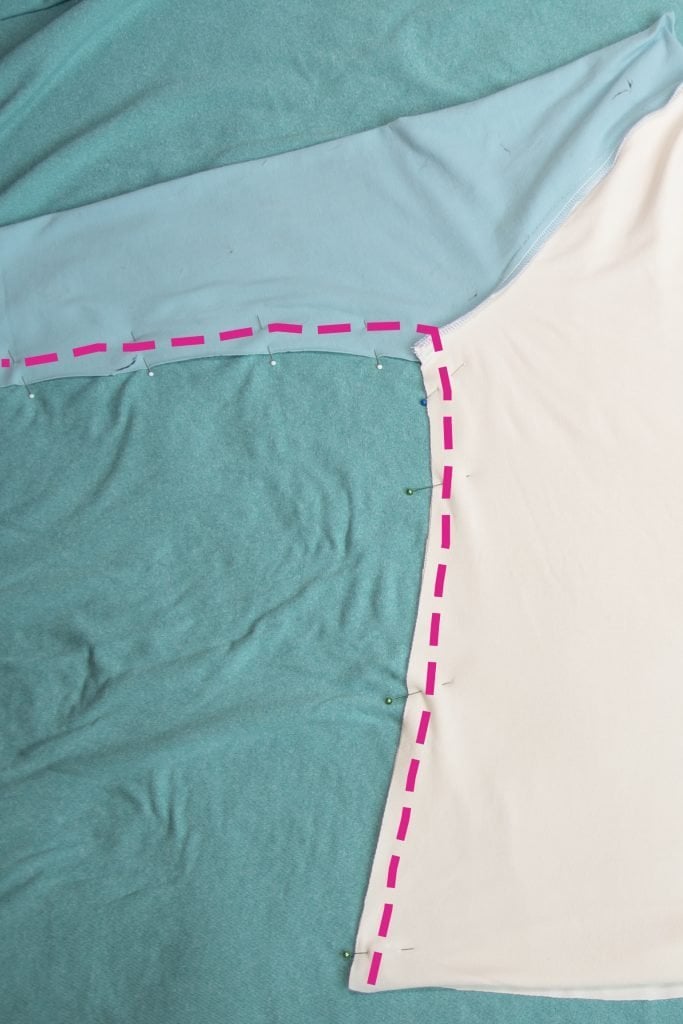
Front sleeve seam

Next, match the front piece right sides together with the front side of the sleeve at the sleeve seam. Pin if you like to, though maybe think about not pinning and do this instead.
You need to use a needle for stretch fabrics. So either a ballpoint needle or my favorite, a stretch needle like a Schmetz 75/11 H-S stretch* or the also good Klasse 75/11 Stretch*. (*affiliate links). Here’s more advice on how to pick the best needles for knits.
Stitch the seam on your sewing machine with a narrow zigzag. For a narrow zigzag, set your zigzag stitch to .5 width and 2.5-3.0 length. This will make it almost a straight stitch, but it’ll still have enough built in stretch that your stitches won’t pop as the fabric stretches while you wear it.
If you have a serger and want to use it here, by all means, serge that seam, but know that you can indeed sew knits without a serger! I’m using 3/8″ seam allowance on my pattern, which I can serge pretty easily. If your pattern uses a wider seam allowance, do that!
Repeat for the second front sleeve seam.
Back sleeve seams
Next match the back side of the sleeve right sides together to the back piece right on the back sleeve seam.

Sew the back sleeve seam (or serge).
Repeat for sleeve #2. Press all the seams towards the body.
Now your t-shirt looks like this:

Side seam + underarm seam
Fold your tee right sides together at the side seams and the underarm seams.
Stitch the side seam and the underarm seam in one long seam.
I like to sew 1/2″ on either side of that little intersection where the sleeve meets the side seam. This helps make sure that that point is right on point literally. If it’s not, you can rip it out without a seam ripper because it’s just a couple stitches. It’s an optional step, but it makes for a nice clean intersection.
We’re almost done! Read on for the neckband and hems…


Elizabeth Farr is the writer behind the Elizabeth Made This blog where she shares helpful sewing tips, step by step sewing tutorials and videos to help you explore your creativity through sewing. She has written sewing Eguides and patterns, been a featured teacher at Rebecca Page’s Sewing Summit and Jennifer Maker’s Holiday Maker Fest and her work has appeared in Seamwork and Altered Couture magazines. She also created a line of refashioned garments for SEWN Denver. When her sewing machine isn’t humming, she’s playing and teaching violin, and hanging around a good strategic board game with her husband and 4 kids.
I love this! You did a great job.
Thanks JeTua!
I was wondering which pattern you used for your blue and white tee. I like the curved raglan seams.
There’s another tutorial here on Elizabeth Made This. Search for “Easy-to-make DIY raglan t-shirt pattern”.