

The light was filmy, and the woods around me positively technicolor. Elaborate spider webs lay untouched and moss grew wild. I half expected a gnome to jump out and yell, gotcha. It was not the place that I first imagined my Sew Over It Penny dress in this rather tropical Lady McElroy fabric to take a walk, but a couple weeks back, as my husband and I explored The Haunted Wood at the Green Gables house on Prince Edward Island, that’s exactly what happened.

Table of Contents
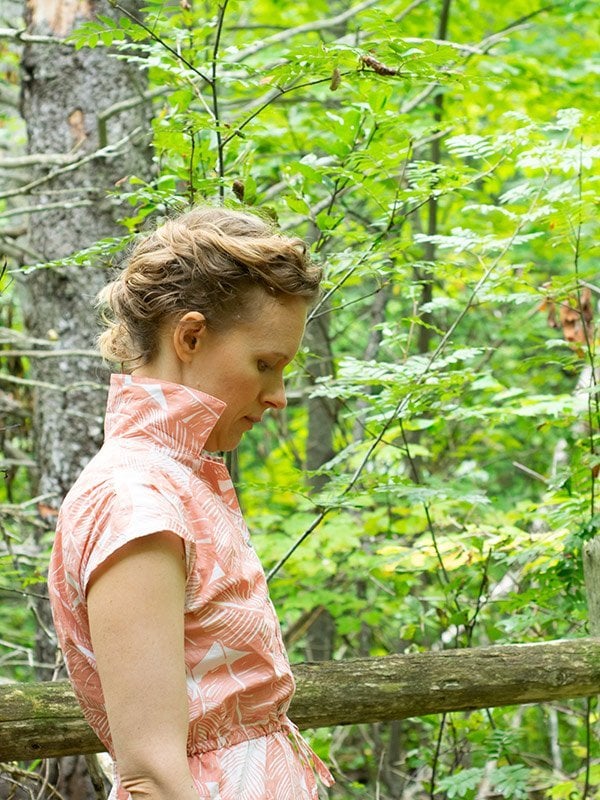
Sew Over It Penny Dress in the Wilds of Canada

Okay, so it wasn’t that dramatic. But still, it’s not everyday my handmade garments get to have such a moody backdrop. Usually, the most common place my handmade garments find them is in the driver’s seat of my minivan with my crew to soccer practice in probably possibly in the form of my latest pair of crazy jams.
It’s pretty easy to see how these woods inspired L.M. Montgomery’s imagination as she wrote Anne of Green Gables. It was too cool to get to take pictures in such a place–the inspiration itself for one of my favorite books of all time. Dude–this dress?! I wouldn’t wear puffed sleeves, but THIS dress!!!!!

But let’s get into my dress itself.
Lady McElroy lawn

I was totally taken by this Lady McElroy lawn. Last year I had seen Lauren Guthrie make it up into a project and instantly loved the peachy pinks. I may or may not have stalked this fabric for a while on about every website possible, trying to justify the price + the crazy expensive shipping from the UK.
As it turned out, Fancy Tiger stocks it which saved me a buttload in shipping plus the chance to see it in person. This is really lovely fabric. It’s crisp and has good structure, making for a proper popped collar, yet it has a hand that’s nearly as lovely as a silk cotton blend. While it wasn’t cheap at $22/yd, this dress only took up 1 1/3 yds with my modification on the skirt.
Narrow that skirt, thread up a drawstring, that’s how we hack it
Just like on my shibori dress, I narrowed the skirt for this version of the Sew Over It Penny dress. I think half circle skirts look great on other people, but they always feel like far too much fabric for my frame and height. This slightly A-line skirt I added from my self-drafted pencil skirt is just the right amount of sweep at the hem for me on this one.

Because I’m like the Princess and the Pea with elastic, I added the drawstring. To do so, I added 2 tiny buttonholes on either side of the center front at the bottom of the bodice. The drawstring is threaded through the casing then. A full elastic waist is perhaps the most uncomfortable thing to me, plus I love how a drawstring is a built-in belt and that I have the option of tightening or loosening it. With a sewn-in elastic waist you don’t have that option, plus you’re probably adding a belt to add some waist definition.
Sew Over It Penny dress pattern review

In terms of the actual sewing of the dress, this is pretty easy sew. There’s no darts or zippers, though there is a collar. I think this would be appropriate for any beginning sewist who’s ready to tackle putting in a collar. There’s no collar stand which requires more precise stitching, and the facing makes for a really clean inside. Shoot, you could make it collarless and make it even easier.
The dress has a great silhouette to it, and I think there’s very few body types it wouldn’t work for. Maybe consider narrowing the skirt if you’re petite like me. Otherwise, this has a great classic look and super easy to style with a jacket, cardigan, tights, whatever!!
A better shoulder yoke

For all the loveliness of this pattern, I have a serious beef with the shoulder yoke. For some reason, the directions would have you leave all of the seam allowances just serged/zigzagged off on the inside.

A clean-finish yoke like what you’d see on the inside of a RTW men’s shirt is SOOOOOOO much nicer and really doesn’t require a whole lot more in terms of the construction. Sometimes rough inside finishes get the job done quickly, and that’s totally okay. In this instance, why you would choose to skip a clean finish is a mystery.
But that’s one of those things. Sometimes you follow the directions to the T and you move on. On the other hand, when you’ve done something a certain way, you have an opinion about it. If you like the way to construct something better than what’s in the pattern directions, make it the way you like. The pattern police won’t come and get you!
That’s my thoughts for the Sew Over It Penny dress and my walk in the woods, but I’m curious:
Are you a follow-the-instructions type, or do you go your own way when you sew?

Elizabeth Farr is the writer behind the Elizabeth Made This blog where she shares helpful sewing tips, step by step sewing tutorials and videos to help you explore your creativity through sewing. She has written sewing Eguides and patterns, been a featured teacher at Rebecca Page’s Sewing Summit and Jennifer Maker’s Holiday Maker Fest and her work has appeared in Seamwork and Altered Couture magazines. She also created a line of refashioned garments for SEWN Denver. When her sewing machine isn’t humming, she’s playing and teaching violin, and hanging around a good strategic board game with her husband and 4 kids.
Very pretty! Nicely done! I barely glance at the instructions! Make things the way I want to with the finishes I like!
Thanks Carrie! It’s true–the instructions are a guideline! I think when you know what you like, that’s what you do!
I loved your Anne of Green Gables story line (one of my favorite books as well), and Prince Edward Island backdrop. What an exciting vacation this must have been. Your dress is gorgeous Elizabeth!
Thank you Faye! I loved them too–it was so cool to be in the place that inspired books that were so alive in my mind as a kid. Just a beautiful place!
Aaaaaahhhh, you got to see Anne’s dress too!
Ok, now that the fangirling is out of the way, it’s a lovely dress too. And I agree with going off-instructions when needed, as long as I have the forethought to plan for those! I’m currently working on a pair of jeans where the instructions said to add the back pockets as the very last thing, after all of the side seams are constructed. Nope. I went ahead and sewed them on the back earlier in the process while it was easier!
Thanks Becky! It was such a wonderful place to visit–I totally had some fangirl moments that my sweet husband didn’t get at all, LOL! Back pockets as the last thing? Wow, I’d go off plan too. I could see that if you weren’t sure about the height of them, but otherwise, sew those puppies on flat!
Gorgeous backdrop for that pretty peachy fabric!
Thanks Katherine. It was such a special place to visit. I’m glad I hustled to finish that dress so that I could get those pics there!
Very cute! I do give the instructions a once over in case there is some new technique, but after that I plough through using the diagrams so I don’t lose track of where I am.
Thanks Linda! I’m with you. Diagrams are wonderful, aren’t they? I love those tiny little ones in Burda with the numbered seams and similar ones in Japanese pattern magazines–it’s remarkable how much information is in them!
I love your dress and your photos on Prince Edward Island are fabulous. I also feel as though circle skirts overwhelm me…love your modified A-line!
Thanks Linda! Such a stunning place. It’s no mystery why Anne came out of that woman’s head there! I think that’s the thing about patterns. When you’ve got some experience, I say hack it up. There’s always elements in patterns that you love and maybe ones that you’d rather do away with. So keep what’s good and change the rest. Style is at least in part about adaptation!