
We’re digging into basics today with how to sew an invisible zipper.
Invisible zippers are one of the most useful types of zippers, but they take a little practice to master.
That being said, if you follow the tips I’m going to share with you here, you’ll be an invisible zipper ninja in no time.
In this post, we’ll talk about what kinds of things invisible zippers are used for. After that, I’ll walk you step by step through sewing an invisible zipper. Throughout there will be some gamechanger tips that’ll help you get the best results with the least frustration.
Grab your zipper and let’s dive into the world of invisible seams.

Table of Contents
What is an invisible zipper?

Before we get into stitching, what is an invisible zipper and why would you use it?
Invisible zippers are narrow zippers made with nylon coils. Like other zippers, you can buy them in just about any color under the sun. The difference is that with a zipped invisible zipper, you should not be able to see the zipper tape at all.
Other than the zipper pull, you won’t see an invisible zipper if you do things right.
To hide a regular zipper, you have to use a different sewing method like a lapped zipper or a fly front construction.
In fact, in a world where you know how to sew an invisible zipper, invisible zippers should be the quickest, simplest zipper to sew.
Where do you use invisible seams?
Invisible zippers are used anywhere where you want a seam to be, wait for it…invisible. Truth in advertising.
You’ll see invisible zippers in skirts, dresses, and pillowcases. They can make nifty zippered pockets.
The thing with invisible zippers is that they’re not the sturdiest. As such, you don’t want to use them in a high stress area or with a really thick fabric. So no to jackets and coats but yes to lighter fabrics.
elizabethmadethis.com is a participant in the Amazon Services LLC Associates Program, an affiliate advertising program designed to provide a way for websites to earn advertising revenues by advertising and linking toSome of the links below are affiliate links. This means that, at zero cost to you, I will earn an affiliate commission if you click through the link and finalize a purchase.
How to sew an invisible zipper: prep the zipper
Getting an invisible zipper looking good starts with prepping the zipper.
First set your iron on a nylon setting. Not too hot here because the iron definitely can melt the zipper’s teeth.
Unzip the zipper and cover it with your press cloth. If you’ve not worked with silk organza as a press cloth, this is the way to go.

pressed zipper (top) vs unpressed


The silk is sheer and offers a lot of protection against the iron’s heat, plus you’ll be able to see where you’re pressing.
With the zipper on the wrong side, press through the press cloth. Really roll the teeth towards the center of the zipper and press with steam. This will help flatten out the zipper and make your seam really get that “invisible” look.
Do this to both sides of the coil. Now to prep your fabric.
Prepping your fabric for an invisible zipper
All zippers need some stabilization, and this is especially true for invisible zippers. Skip this step, and you will end up with a wavy stretched out invisible zipper.

Fuse a line of stay tape on the wrong side of both sides of the seam where you will add the invisible zipper. Also finish the edge of the seam with a zigzag stitch or a serger.
Be sure to check your pattern to see how wide your seam allowance is. Most invisible zippers, if you line up the edge of the zipper to the fabric will give you a 3/8″ seam when you sew it. For most commercial patterns with 5/8″ seam allowances, you will either need to trim off 1/4″ of seam allowance in the zipper area or apply the zipper tape 1/4″ from the edge. Just be aware of this and adjust as needed.
How to sew an invisible zipper
Stitching the first side
It’s time to pop this zipper into where it belongs.
Flip the zipper so the right side of the zipper matches the right side of your seam. Keep the top stop 1/2″ from the seamline at the neck (on a 5/8″ seam) or just below the waist seamline. Pin the zipper at the top.
If you’re using a 5/8″ seam allowance where the zipper is, draw a line 1/4″ from the edge. Line up the zipper tape edge with this line.


Using your invisible zipper foot, starting in the middle of the zipper stitch down the left side of the zipper stitching towards the top. Be sure to let the coil run through the right groove in the foot.
Once you’ve done this, flip the zipper around and sew down towards the zipper stop. This time, let the coil run through the left groove of your foot. Stitch as close as you can to the stop, backstitching at the bottom.
Basting the second side
This is the part that will make all the difference.
Zip the zipper. Make a mark on the unsewn side of the zipper so that it’s even with the top of the sewn side.

If your zipper crosses a seam like a waist or something else, make a mark on the zipper tape where that point happens. Do the same thing if you’re trying to match a pattern like a stripe.
Just as you did before, draw a line 1/4″ from the edge. Line up the zipper tape edge with this line.
Bring the right side of the other side of the seam to the right side of the second part of the zipper. Using a long basting stitch, stitch about 1″ on at these marks.

basted at top and seam didn’t make it intersection looking good


Check your work. Zip up the zipper again, checking to make sure if those points sit in the same place on both sides.
If you missed, one side of the zipper will sit higher than the other. If that happens, pull out the basting stitch and try again.
Once you have it, you’re ready to finish.
Sewing the second side
Line up the right side of the zipper foot with the right side of the zipper. Sew down the second (right) side of the zipper, letting the coil pass through the groove in the foot.

Sew as close to the bottom as you can, backstitching at the bottom.
Lightly press the zipper, using a press cloth to protect the teeth.
Sew the seam
From here, sew up the rest of the seam, getting as close to the bottom of the zipper as you can. Be sure to move the zipper tape out of the way as you sew. Press the seam open.

Finish the inside of your invisible zipper seam
To finish up, sew the remaining tape to the seam allowance, close to the edge of the tape. I like to do this with a regular zipper foot, but use what you like here. If you find that there’s a tiny hole because you couldn’t stitch close enough, thread up a hand needle. Stitch a couple stitches to close up the hole. It won’t take more than a couple stitches.

Zip up your finished zipper and enjoy the results!
Question: What if I don’t have exactly the right color invisible zipper?
No problem. Pick a reasonable match, and then sew it well. As long as you press your zipper before hand, your zipper will look great.
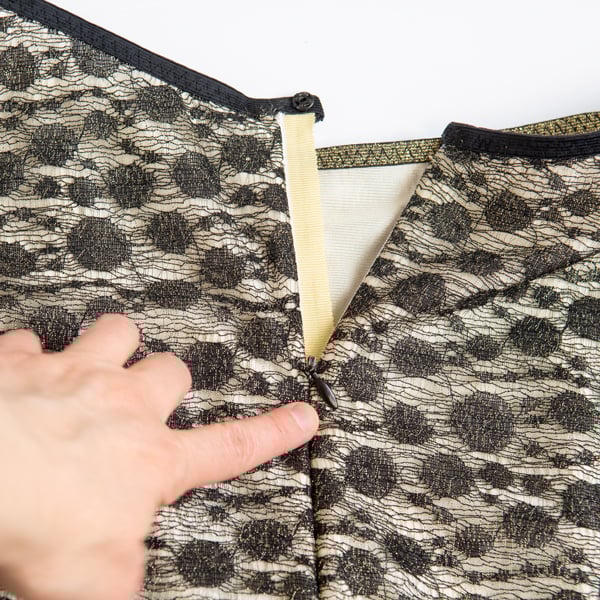
Get some matching nail polish and paint the zipper stop. I once had to put in a cream zipper that matched my lining on a black lace skirt. It sounds strange but it was the right thing to do for that fabric. A little black nail polish on my stop, and you’d never know. If you look really close you can see the cream tippy top of the zipper and the black pull.
So those are the basics of how to sew an invisible zipper. Give these zippers a chance. I think after a little practice, they will be some of your favorite zippers!


Elizabeth Farr is the writer behind the Elizabeth Made This blog where she shares helpful sewing tips, step by step sewing tutorials and videos to help you explore your creativity through sewing. She has written sewing Eguides and patterns, been a featured teacher at Rebecca Page’s Sewing Summit and Jennifer Maker’s Holiday Maker Fest and her work has appeared in Seamwork and Altered Couture magazines. She also created a line of refashioned garments for SEWN Denver. When her sewing machine isn’t humming, she’s playing and teaching violin, and hanging around a good strategic board game with her husband and 4 kids.
Great tutorial! I recently used this method on a side zip and it worked well. But I do remember (in the past) basting the seam, then sewing both sides of the zipper tapes, and finally picking the basted seam open to “expose” the zipper. I’m wondering why that has changed? (Better finish?)
You are so right about basting. A few stitches really make a big difference. (I use red thread for easy removal.) And I purchased the organza pressing cloth you recommend – awesome! I’ve always used an old linen tea towel – but now I can see what I’m doing! Ah, the pleasure of little things!
You definitely can baste the tape. I find personally that unless you’re hand basting, you can overhandle the tape, and especially with invisible zippers you can get a tape that gets wavy as a result, so I choose to baste only the key points, but if you like the result you get, go for it.