
Ever thought about how to make tab top curtains?
Custom curtains are one of the best ways to put your own personality stamp onto your house. The good news is that tab top curtains are super easy to sew.
Tab top curtains make for a casual look you can use and love in kids’ bedrooms, for DIY camper curtains, simple kitchen curtains and more.
We’ll talk about what tab top curtains are, the best fabrics for tab top curtains, and how to measure for your curtains. After that, I’ll finish up by showing you how to make tab top curtains from start to finish.
elizabethmadethis.com is a participant in the Amazon Services LLC Associates Program, an affiliate advertising program designed to provide a way for websites to earn advertising revenues by advertising and linking toSome of the links below are affiliate links. This means that, at zero cost to you, I will earn an affiliate commission if you click through the link and finalize a purchase.


Table of Contents
Supplies for DIY tab top curtains
- tape measure
- Home decor fabric: 45”-54” wide
- gridded cutting mat
- rotary cutter or scissors
- 3” wide Buckram tape, iron on or not
- quilting ruler
- matching thread
- Turn-it-all tubes
- Simflex button sewing gauge (optional)
- fabric marker
- Clover Hot Hemmer (optional)
- Pins or Clover wonder clips
What kind of fabric should I use for tab top curtains
Tab top curtains look great in most home décor fabrics. I would skip sheer home décor fabrics because they don’t have enough weight for the tabs to hang well on your curtain rods.
Good choices are:
- Cotton sateen
- Duck cloth
- Canvas prints
- Cotton/linen blends
- Denim
- Twill
All of these fabrics are easy to work with and will require minimal care.
If you can, try to get 54” width fabric. 45” width fabric is often too narrow for a lot of windows. Just something to note, but it’s not a dealbreaker, and of course, only buy fabric that you love no matter the width.


Where to buy fabric for tab top curtains
I’ve personally been really impressed with the cotton ducks at my local Hobby Lobby. Per yard, they’re a great price, especially with sales, and they come in a lot of fun prints.
I think either this camper print duck fabric or Route 66 duck fabric would make such cute DIY camper curtains!
For living room tab top curtains, this cowhide print is pretty cool. There’s also some great choices for kitchen curtains.
Looking through Hobby Lobby’s inventory online and in the store of these particular cotton ducks, I don’t think there’s a better deal around if you want to make your own curtains. After all, curtains eat up a lot of yardage, so this is a huge win for saving money!

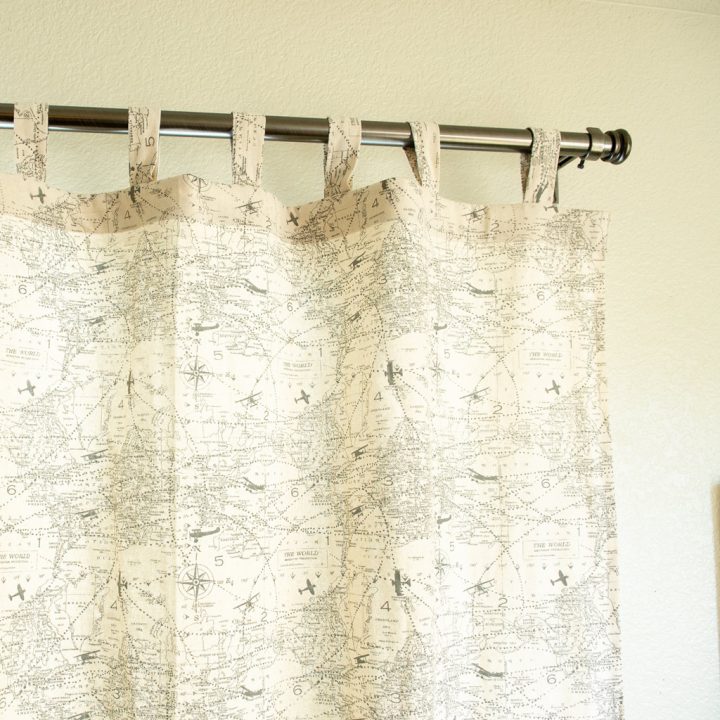
For this project, I’m using this plane routes print. It’s perfect for my boys’ room!
Definitely check out the Ultimate Jumbo Mega Guide to Online Fabric Stores for some more great places to find home decor fabrics.
How much fabric for making curtains?
How to measure windows for width
Before we get into talking about how to sew tab top curtains, you need to know how much fabric to buy.
Use your tape measure to measure your window from side to side. Multiply that measurement by at least 1.5 times. If your window is 36” wide, you’ll need 54” of fabric.
Don’t skimp here. Remember how I said that a 45” wide fabric could be too narrow? That’s because curtains look best with some natural folds. Our tabs at the top of the curtains will create these natural pleats. Give them some room to breathe.
How to measure windows for curtain length
Measure your window vertically. It’s always a good idea to give yourself some space above and below the window, but it’s really up to you how long you want your DIY tab top curtains to be.
Floor length curtains will always provide a lot of drama in a room and make your room look taller. That being said, you might not need or want curtains that long.
In my case, I needed to cover some short windows that are just above my boys’ bunk beds. The other curtains cover the large window in their room, and it too is behind a bed.
I typically like to drop curtains to the floor, but there was no space here for that.
The same is true for DIY camper curtains or DIY kitchen curtains where you probably want to just have a valance so you can see out your window.
Whatever your length you decide for your curtains, add 8” in length for each panel you make.
Here’s a recap of the measurements:
- Width of curtain = window width x 1.5. Decide how many panels you’ll need.
- Length of curtains = desired length + 8”. Divide by 36 to get the yardage you’ll need for each panel.
- Add the total yardage for all the panels you’re making, then add another ½ yard. This extra yardage will give you enough for straightening the grain on your fabric and making the tabs.
Pro tip: Don’t skip the buckram
I’ll keep saying this until I die. Your curtains need buckram. It’s the header tape that will give your tabs the support that they need and help the curtain’s top drape well.

Buckram is cheap per yard and it’s absolutely essential for DIY curtains whether you’re making grommet curtains, tab top curtains or some other kind.
How to make tab top curtains
Now that we’ve figured out the preliminaries, it’s curtain sewing time!
Prep your fabric
To start off, pre wash your fabric and dry it. I like to use a cold cycle to preserve all the colors.
Next, iron the whole length of the fabric to get out any wrinkles.
After that, lay your fabric on a gridded cutting mat. Line up the selvages to on both sides so that they’re covering the same number of squares.
Next look at the cut end of the fabric. Use a ruler to draw a line perpendicular to the top edges of the selvage ends. Cut on this line.
Alternatively, if your fabric will tear, make a snip into the selvage and tear the fabric from selvage to selvage. Because of how woven fabrics are made, it will tear right along the grain.
It’s important to take the time for this step because curtains cut on the grain will hang properly.
Use your gridded mat to measure out the entire length of your panel you recorded earlier, then tear at the final length from selvage to selvage.
Now we have a nice actual rectangle of fabric which will make the sewing much better.
Cut curtain panel facings and tabs
For each panel you make, cut a piece of fabric 3.5” wide x the width of the fabric. You can snip and tear just like you did on the panel for maximum accuracy. This will be a curtain panel facing.
For the tabs, cut 3” strips that are the width of the fabric. Don’t worry about the finished length of the tabs. We’ll cut that later.
Pressing the sides and hem
Next, press the selvages vertically in towards the wrong side of the fabric. The printed edge of most home dec fabrics is where the selvages start.

If you’d like, you can fold the width of the selvage over again and press to create a double-turned hem. I left mine raw to cut down on the bulk.
Repeat for the second selvage edge.


For the hem, press up 4” on the bottom of your curtain panel with a hem gauge like Clover’s Hot Hemmer. Alternatively, you can use file folders cut to specific widths for easy pressing.
Unfold the hem, then press back 1/2”-3/4” just to conceal the raw edge. You’ll have 2 folds in your hem. Fold the hem back on itself and press again.
Sewing the hems and sides
From here, sew the curtain sides down from top to bottom with a 3.0 mm straight stitch close to the pressed edges. An edgestitching foot is a good choice to help you sew bang on that edge! Also stitch up the hem.

Make the curtain facing
Cut a length of buckram as wide as the curtain panel.
Place the buckram against the wrong side of the curtain facing, then wrap the selvage around the end of the buckram. Be sure to line up the raw edge with the top edge of the facing.


Set your machine to a long basting stitch, then stitch from selvage to selvage. When you get to the second selvage, cut off any extra buckram so you can wrap the selvage around the end of the selvage. Now your facing should be the exact width of the curtain itself.
To finish off the facing, wrap the extra fabric around the bottom of the buckram, then stitch across with a basting stitch.
Set the facing aside.
How to make curtain tabs
Fold the strips of fabric you cut for the curtain tabs in half lengthwise with right sides together. You can use clips here for an easy way to keep the edges even while you sew.


Set your machine back to a 3.0mm long stitch.
Sew down the long edge with a 1/4” seam allowance. If you’d like, you can press the seam open, but it’s not 100% necessary.
From here, use the large tube from your Turn-it-all tubes to turn the tube right side out. If you don’t have a tube turning set like this, you can also use a safety pin.
Rotate the seam so that it’s in the middle of one side of the tube, then press.
To finish off the tabs, cut 8” lengths with a ruler from your tube. You’ll need 8 tabs for each curtain panel.
Mark your panel
Use a ruler and a fabric marker to mark an even distance at the top of your panel to accommodate your 8 tabs. If your curtain is wider than 45”, use 10-12 tabs.

I like to use a Simflex gauge here to make my measuring easy.
Sew the tabs
Fold each tab in half vertically. Pin a tab to the curtain at each mark you made so that the tab’s seam is face up.
Place the facing on top of the tabs and clip in place with the right side of the facing on top of the tabs.

Sew across the top of the curtain through the facing and tabs with a 1/2” seam allowance.
Press this seam towards the facing, then press the facing to the inside. Be sure to press the top edge well.


Finish off the top of the curtain by sewing down the facing along the bottom edges and sides. Then sew across the top of the curtain, close to the edge to flatten out the tabs.
And that’s how to make tab top curtains. I love how these ones turned out and how pretty the light looks filtering through them!


How to sew tab top curtains for custom home decor you'll love
If you want custom curtains without the custom price, here's how to make tab top curtains for any space in your home.
Materials
- Home decor fabric: 45”-54” wide
- 3” wide Buckram tape, iron on or not
- matching thread
Tools
- tape measure
- gridded cutting mat
- quilting ruler
- rotary cutter or scissors
- Turn-it-all tubes
- Simflex button sewing gauge (optional)
- fabric marker
- Clover Hot Hemmer (optional)
- Pins or Clover wonder clips
Instructions
- Wash, dry and iron your fabric, then cut panels the length you want + 8"
- For each panel you make, cut a piece of fabric 3.5” wide x the width of the fabric. This will be a curtain panel facing.
- For the tabs, cut 3” strips that are the width of the fabric.
- Next, press the selvages vertically in towards the wrong side of the fabric. Repeat for the second side.
- For the hem, press up 4” on the bottom of your curtain panel. Unfold the hem, refold it, and press again, making sure the shorter width is enclosed.
- Sew the curtain sides down from top to bottom with a 3.0 mm straight stitch close to the pressed edges. Stitch across the hem.
- Place the buckram against the wrong side of the curtain facing, then wrap the selvage around the end of the buckram. Be sure to line up the raw edge with the top edge of the facing.
- Baste through the buckram and fabric from selvage to selvage. Wrap the selvage around the end of the selvage, then wrap the extra fabric around the bottom of the buckram, and stitch across to finish the facing.
- Fold the strips you cut for tabs in half lengthwise. Stitch down the long side with a 1/4" seam allowance.
- Use your Turn it All tubes to turn the tube right side out. Press. Cut the tabs into 8" lengths.
- Fold the tabs in half and pin them to the panel at even intervals with raw edges of the tabs even with the raw edge of the panel.
- Place the facing right side down on top of the tabs and pin.
- Stitch across the top of the curtain through all layers with a 1/2" seam allowance. Press the seam towards the facing.
- Flip the facing inside and press along the top edge. Finish off by stitching down the facing at the top, sides and bottom, close to the pressed edges.
- Enjoy your new beautiful DIY tab top curtains!
Notes
You can make curtains any length you'd like, but be sure that the width of your fabric is at least 1.5 times as wide as your window. If it's not, simply sew as many tab top curtain panels you need to get to that measurement.
Recommended Products
As an Amazon Associate and member of other affiliate programs, I earn from qualifying purchases.
-
 Clover Wonder Clips, 1 Pack, Colors May Vary
 -
Home Sewing Depot Buckram, Iron On, 4" Wide 6 Yd Package
-
OLFA 45mm Quick-Change Rotary Cutter (RTY-2/C) - Rotary Fabric Cutter w/ Blade Cover for Crafts, Sewing, Quilting, Replacement Blade: OLFA RB45-1 (Aqua)
-
Dritz 890 Superboard Durable Kraft Board, 39-3/4 x 72-Inch
-
Kai 7230 Sewing Scissors
-
Clover 5032 Purple Fine Air Erasable Marker with Eraser
-
O'Lipfa 16318 Ruler with Lip Edge, 3 x 18-Inch , White
-
CLOVER 7806 Hot Hemmer


Check out more home sewing projects:

How to make a fabric wreath with gorgeous velvet + buttons
With Christmas decorating time upon us, let’s talk about how to make a fabric wreath….

How to make a pillow from a sweater (easy project for Fall)
I’ve got a quick and cozy project for Fall for you: how to make a…

How to make an ironing board cover (free pattern)
Let’s talk how to make an ironing board cover. Let’s be honest…. If you sew…

Elizabeth Farr is the writer behind the Elizabeth Made This blog where she shares helpful sewing tips, step by step sewing tutorials and videos to help you explore your creativity through sewing. She has written sewing Eguides and patterns, been a featured teacher at Rebecca Page’s Sewing Summit and Jennifer Maker’s Holiday Maker Fest and her work has appeared in Seamwork and Altered Couture magazines. She also created a line of refashioned garments for SEWN Denver. When her sewing machine isn’t humming, she’s playing and teaching violin, and hanging around a good strategic board game with her husband and 4 kids.