

Today we’re breathing some new life into 2 boring lampshades with these 2 easy DIY lampshade makeovers.
Lampshades are a funny thing.
You don’t notice them in a room, but when you take a few minutes to spruce them up, you’ll wonder why you never paid attention to them before.
Even better, this is a project you can make in about 20 minutes. This is a great project for beginner sewists and a fantastic way to use up funky remnants of fabric.
For this project, I’ll show you how to freshen up a classic lampshade as well as a rectangular shade.
So go find your boringest lampshade and let’s fix it together.
elizabethmadethis.com is a participant in the Amazon Services LLC Associates Program, an affiliate advertising program designed to provide a way for websites to earn advertising revenues by advertising and linking toSome of the links below are affiliate links. This means that, at zero cost to you, I will earn an affiliate commission if you click through the link and finalize a purchase.
Before we get into the post, why not save it to Pinterest so you can find it later? Click the “Pin Me” button
on the image below.

Table of Contents
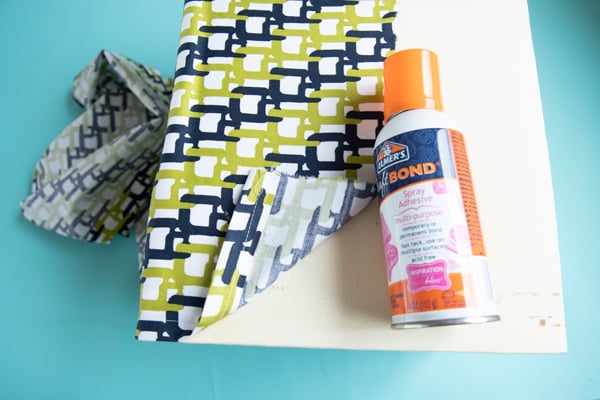
Supplies for DIY lampshade makeovers
What are the best fabrics for DIY lampshade makeovers?
You’ve got a lot of choices here.
My go to is to go for natural fiber fabrics. Linen, cotton, linen blends are all good. Choose something that is light to medium weight, and for heaven’s sake pick a fun print.
We’re trying to un-boring your lamp, and plain fabric ain’t gonna do it. Here’s some picks to spark some ideas.
- Sevenberry flax vines canvas
- Art Gallery Earthen Gaia Eventide quilt fabric
- Art Gallery Sage Painted Desert Quilt
- Lower The Volume Quiet Downtown Quilt
- Joel Dewberry Modernist Perch Violet Voile


DIY lampshade makeovers: Classic lampshade
There’s all kinds of names for lampshade shapes, but this is probably the shape you think of when I say lampshade.
Rounded bottom with sides that slope up to a smaller circle up top.

This type of DIY lampshade makeover will require a little bit of pattern making, but it’s super simple. Let me show you how.
Prep your lampshade
Unscrew the lampshade from the lamp.
Pull off the old lampshade cover and any trim. Most covers are affixed rather loosely and should peel away without too much trouble. If you’re working with a vintage lamp, you might need to be more careful as you peel away the old cover.
Know that you also can cover straight over your old cover if you’d rather.
If the fabric is weird or that icky pleated stuff, see if you can pull it off.
Make the pattern
Draw a vertical line on a piece of paper.
Line up your lampshade with the line, making a mark at the top and bottom of the shade.
Now for the fun part.

Roll the lampshade on the paper, tracing along the bottom edge of the lampshade as you go until you get back to the seam. Mark a point at the seam on the bottom and top of the lampshade and connect them to make a second vertical line.
Repeat the rolling and tracing for the top of the lampshade.
Use a ruler to add 1/2″ to the top and bottom and 1″ to one side for hems.
Cut your fabric
Cut out the lampshade from your choice of fabric using the pattern.

Press up the hems
Press up 1/2″ on the top, bottom and one side of your fabric. You’ll overlap the raw edges on the second side, so don’t worry about that.

Hem your cover
Stitch 1/8″ from the edge with a simple straight stitch around the top, bottom and pressed side.
Press the stitched edges.

Cover the lamp
Word of warning here: work outside for this part.
Spray glue has strong fumes and it definitely is not good to breathe that junk in.
Find the vertical seam on your lampshade. Spray a small amount of spray glue on the line.
Press your cover over the area you just sprayed starting at the unhemmed edge.
Continue to add a little glue, then press on the fabric all the way around the lampshade.
When you get to where you started, spray a little on the wrong side of the hemmed side and overlap the fabric.
Let the glue dry for about 10 minutes.
Add the trim
To add some interest to your fringe trim, thread up an embroidery needle with embroidery floss.
Weave the floss in and out of the trim in the open space of the trim, moving your needle in and out. Add 2-3 more rows in different colors.
If you like, zigzag on some mini pompom trim on the top of the fringe trim.


When you like the look of your trim, heat up your glue gun.
Add a 1″ line of hot glue on the bottom of the shade. Press on your trim.
Keep adding more glue and pressing on more trim all the way around the shade. Overlap your ends to finish it off.
Tada! Now you’ve got a much more interesting lampshade.
On to the rectangular shade.


Loving this post? Click on the buttons below to share it with your friends.
[addthis tool=”addthis_inline_share_toolbox_jb3t”]
Rectangular box shade DIY lampshade makeover
A little backstory. This lamp has been through it. It came with a moss brown velvet ribbon on top it’s canvas cover. At some point, I pulled that icky stuff off and recovered it with this wasabi dot cotton. Pretty cool, but it was getting dirty and it was time for a refresh.

For this tutorial, I’m going to assume that you, like me have a cover that you can pull off and use as a pattern.
Measuring your lampshade (if you don’t have a cover you can use as a pattern)
If you don’t have a cover you can pull off, simply measure around your lampshade with a measuring tape, then add 1″.
Also measure the height of your lampshade and add 1″.
Cut out the fabric

Lay down your old cover on top of your fabric. Use chalk to measure 1″ around your piece on the top and bottom and one side. Cut on the lines.
Alternatively, if you measured the lampshade, measure out your dimensions onto the fabric. Cut on the lines.
Press the hems

From here, fold the raw edges of the fabric around the old cover and press in places.
If you measured the lampshade, press up 1″ on the top, bottom and sides.
Remove the old cover.
Hem your cover
Stitch 1/2″ from the edge with a simple straight stitch around the top, bottom, and pressed side.
Glue on the cover
Just like with the previous lampshade, attach the cover to your lampshade with spray glue. Work outside, spray a little bit, smooth on a little fabric and so on all the way around the shade. Overlap the last bit, adding a bit more glue on the pressed edge to overlap where you started gluing.

Let the glue dry completely.

And that’s all there is to it to making these 2 easy DIY lampshade makeovers.
Want some more home decor sewing ideas? Check out these posts.

How to make lined grommet curtains
Simple sewing to make a big impact in your home decor

7 home dec sewing tips that’ll help you make a beautiful home
You + your sewing machine + simple sewing + these tips = a house you’ll love

How to make chair cushions
Make your chairs more comfortable with this easy sewing tutorial.

Elizabeth Farr is the writer behind the Elizabeth Made This blog where she shares helpful sewing tips, step by step sewing tutorials and videos to help you explore your creativity through sewing. She has written sewing Eguides and patterns, been a featured teacher at Rebecca Page’s Sewing Summit and Jennifer Maker’s Holiday Maker Fest and her work has appeared in Seamwork and Altered Couture magazines. She also created a line of refashioned garments for SEWN Denver. When her sewing machine isn’t humming, she’s playing and teaching violin, and hanging around a good strategic board game with her husband and 4 kids.