


With so many helpful sewing tools out there, which are the best sewing tools out there?
If you’re just getting started sewing, it’s good to know what kind of sewing tools for beginners are out there. I know my Gram had a basic sewing kit full of all the essentials, though I admit my sewing kit looks different than hers.
As the daughter of an engineer, a good gadget wins a lot of appreciation for me.
And I’ll be the first to admit that I probably have too many sewing (and kitchen) tools.
But if a tool actually makes my life easier, I get practically evangelical about it.
Which basic sewing tools are of the deserted island variety?
elizabethmadethis.com is a participant in the Amazon Services LLC Associates Program, an affiliate advertising program designed to provide a way for websites to earn advertising revenues by advertising and linking toSome of the links below are affiliate links. This means that, at zero cost to you, I will earn an affiliate commission if you click through the link and finalize a purchase.
Before we get into the post, why not save it to Pinterest so you can find it later? Click the “Pin Me” button
on the image below.

elizabethmadethis.com is a participant in the Amazon Services LLC Associates Program, an affiliate advertising program designed to provide a way for websites to earn advertising revenues by advertising and linking toSome of the links below are affiliate links. This means that, at zero cost to you, I will earn an affiliate commission if you click through the link and finalize a purchase.
Table of Contents
What is the most essential equipment in sewing
Beyond a sewing machine, and a good iron, here’s a list of basic sewing tools every sewing beginner needs to have:
- Small embroidery scissors or thread snips
- Seam ripper
- Scissors for fabric cutting only: Decide which are the best sewing scissors for you.
- Sewing pins: glass head are excellent, but pick the ones you like.
- Measuring tape: a non-flexible one is good. Wawak has the best ones for cheap!
- Quilting ruler: 3″x18″ with 45 degree angle marking
- Selection of thread: Avoid the sewing thread in sewing kits…it’s often not the best. Go for an assortment from Coats’ and Clark or Gutermann.
- Chalk wheel or Chakoner: for marking fabric.
- Hand sewing needles: for buttons and a lot of other basic tasks.
- Simple pincushion: here’s a DIY magnetic pincushion to try.
What kinds of things should advancing sewists add to their essential sewing tools supply?
The more you sew, the more you’ll want to start to create your own looks. And you’ll also want your seams to look crisp and lovely.
Here’s a few things you’ll need as you advance in your sewing skills:
- Tailor’s Ham: for collars and pressing curves
- Sleeve roll: for pressing pant legs and other long seams
- French curve ruler: for drawing smooth curves when you draft or hack sewing patterns.
- Button marking tool (Simflex): this specialized gauge is a life-saver when it comes to marking buttons!
- A set of turning tubes: Lots of things need to be turned inside out from spaghetti straps to collars to ties and lots more. Small narrow things are easy to turn with things like Turn-it-All Tubes.
Sticky question: Should I get a sewing kit for beginners if I’m just getting started sewing?

This is a tough question. On the one hand, I know it’s a bit of an investment to get started sewing. Basic sewing kits can be an easy way to get a lot of sewing tools all in one spot for not that much money.
My Gram had a cookie tin filled with all of her sewing essentials, but these days you can find all kinds of sleek zippered cases filled with basic sewing tools.
That being said, I’ve never seen either good quality thread or scissors in a sewing kit for beginners
Until someone proves me wrong, I cannot recommend a sewing kit for beginners that you haven’t built yourself.
If you want to make your own DIY basic sewing kit, use the list above in the essential equipment in sewing list to give you an ideas of where to get started. For more specific recommendations, keep on reading.
If you buy nothing from this list, invest in a good pair of scissors and a few spools of good thread. Gingher lightweight shears are really sharp and easy to handle and around $15. Thread goes on sale all the time too–pick up a few colors every time you go to a fabric store on sale days. It’ll make your beginner sewing life so much better!
Now that you’ve got a list of sewing tools for beginners and other basic sewing tools for advancing sewists, let’s talk more in depth about some of the best sewing tools.
Sewing tools with names and pictures
Here’s a quick reference picture of sewing tools with names and pictures:

Sewing tools for cutting
There’s plenty of different types of helpful sewing tools, and cutting tools are some of my favorites. Fabric that’s cut well will give you a much nicer project in the end.

1. Small embroidery scissors
A lot of people would say “seam ripper” as their #1 sewing tool. And why not?. We all make mistakes and need that faithful friend to help fix them.
But I’m going to go out on a limb and say that small embroidery scissors are even more useful.
These Gingher Stork scissors are my absolute favorite. I hang these little embroidery scissors on a ribbon around my neck when I’m sewing.
They’re great for clipping threads and trimming small corners. And because they’re my necklace of choice, I’m never having to fish around for scissors when I’m sewing. When I’m going for lightning fast sewing efficiency, these are my BFF.
Also, they double as a seam ripper. The fine blades fit right inside a stitch, so you can pull out errant stitches really easily with about 0% chance of damaging your fabric.
If you’ve ever put a hole in your fabric with an eager seam ripper, give small embroidery scissors a chance.
2. Awesome scissors for fabric only!!!

Rotary cutters are wonderful gadgets. But you need a cutting mat making them less portable.
You know what cutting tool will never let you down, and you can carry anywhere? An excellent pair of scissors.
The best sewing scissors are the ones that fit your hands and you keep wicked sharp. I love these serrated Kai 7250-SE Serrated Scissors.
They’re lightweight which is huge for my small hands.
True: I actually once took a pair of heavier Gingher shears back to JoAnn for a refund because they hurt my hands. The cashier thought I was bananas.
It’s hard for me not to sound like a commercial with these guys. But seriously, the first time you cut with them it’ll feel like every other pair of scissors you’ve owned up until this point might as well be rusty garden shears.
Win-win: sharp scissors save you time. When you save a little time, that’s one more way you can make time to sew.
Sewing tools for the construction process
Let’s talk gizmos that can make your actual sewing process more fun.
3. Turn it all tubes

I think one of the first projects I did as a kid was to make an elastic hair scrunchie. After sewing the whole thing, I used my fingers to try and turn the tube to the right side. I got there eventually, but I was frustrated and annoyed with the process.
Oh, but I wish I had these Turn it all tubes. They’re a lot like drinking straws, but they’re more sturdy. Basically the idea is that you take a tube you need to turn to the right side. Put your chosen diameter straw inside.
Then push the dowel or metal stick from the wrong side through the hole in the straw. The tube will go through the inside of the straw turned perfectly pretty much instantly.
If you make belts, spaghetti straps, or any kind of tie, these work unbelievably fast. They’re so speedy that they earn a well-deserved spot among the most helpful sewing tools.
See how this one works in action on the video below plus some of the other tools in this article.
4. Glass head pins

To be totally transparent, I don’t use that many pins. In fact, you can read here about why I think you should give sewing without pins a good try.
That being said, people love them some pins. And they do have a place in a sewing arsenal.
If you do use pins, get some really fine glass head pins. They have a small diameter so they won’t poke big old holes in you or your fabric.
Plus, you can iron right over them. Plastic head pins, not so much.
I love using these for fitting and especially for holding pleats in place when they need to be pressed.
And once you have a good set of pins, keep them handy with a DIY magnetic pincushion.
Make a DIY magnetic pincushion
Keep those pins away from your feet!

Tailoring tools
At some point in your sewing life, you really want your sewing projects to look professional. One of the easiest ways to do that is to invest in some good tools for tailoring. Pressing is so much of tailoring, and this trio of tailoring tools will help you get nice pretty pressed seams.
5. Tailor’s Ham
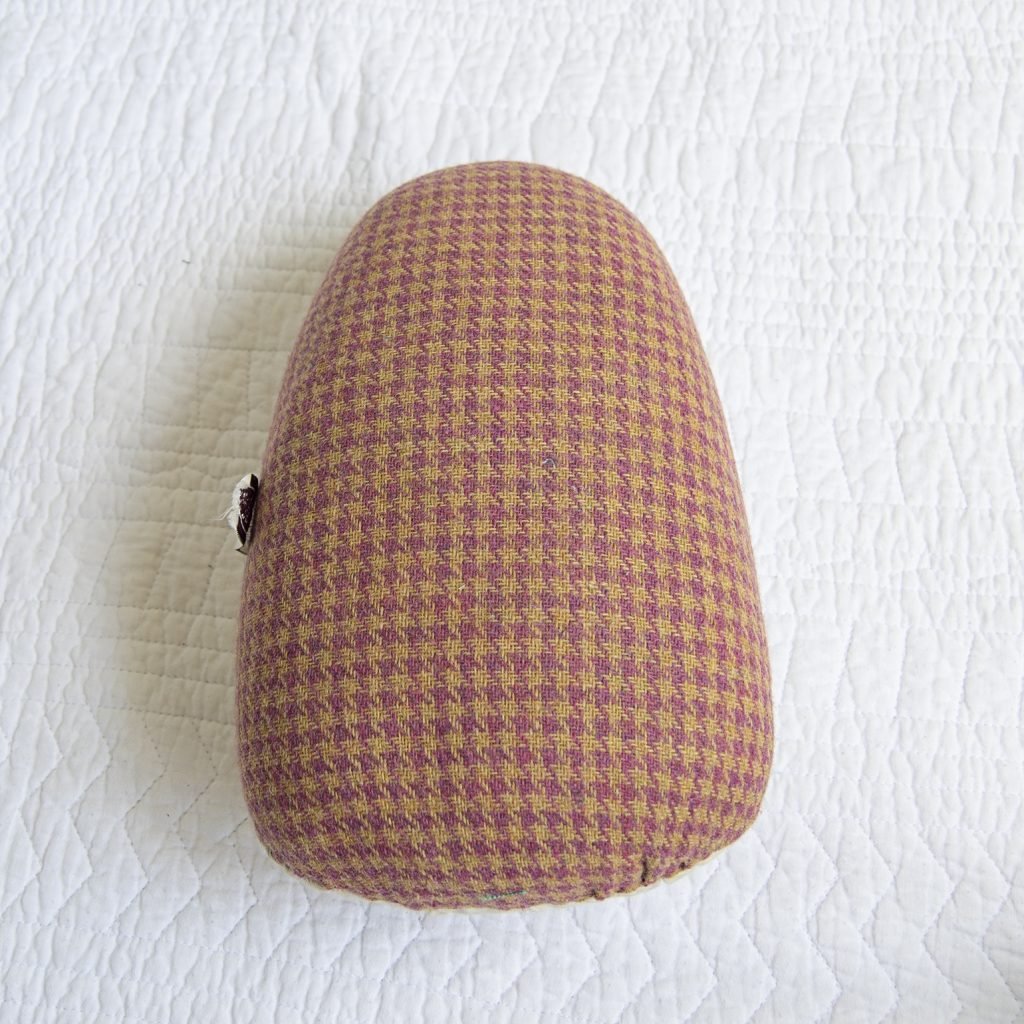
Tailor’s hams are called that because they look like a ham. So original, I know. This sturdy little device, usually filled with sawdust will help you press curves really easily.
Once you get used to pressing sleeve caps, collars, and curvy hems on a ham, it’s really hard to go back. All you do is drape a curve over the ham and press it as it lies. Let it cool on the ham and you’ll have built some beautiful shape into your garment.
For collars, you can wrap it around the ham and steam the shape right in.
There are holders you can buy for hams, though I’ve never found I need one.
Fun fact: a football tee will hold a tailor’s ham quite well.
6. Sleeve roll

Sleeve rolls are like tailor’s hams, but for sleeves. Press the seams on long leg seams or inside a sleeve.
Sleeve rolls can really help you press a long seam nice and flat. And because they’re fairly small in diameter, they help you create a pressing surface in places the pointy end of a ironing board is too wide to reach.
Bonus: Pressing on the curved surface of a ham or sleeve roll can also stop the pressed seam from making an imprint on the right side.
7. Point presser/clapper

Let’s just throw it out there that tailoring tools have cool names. Clappers combine a little brute force with steam to help you make pancake-flat seams.
Press a seam, plunk down the clapper right over it to hold in the steam. Most of the time, you don’t actually have to actually smack the fabric [though clapping fabric is indeed cheaper than therapy]. Holding the clapper firmly on a pressed seam will do the trick.
The clapper will help the heat relax the fibers of the fabric. Just like with the ham, let the fabric cool and you’ll be rewarded with such a lovely seam.
I like this combo point presser/clapper. In the combo, the point presser is a handle for the clapper. Point pressers can help you get into the tiny nooks and crannies of a collar when you press it.
If you like sharp collars, a point presser is a must. It’s another one of the those helpful sewing tools that it’s hard to go back after having used it.
I keep my team of pressing supplies right under my ironing board so I can batch my pressing. That’s one of the 41 tips in my ultimate guide to sewing efficiently.
Tools for marking
There’s so many ways to mark your fabric and prep a pattern for sewing. These ones you should always have on hand.
8. Quilting rulers

Quilting rulers are incredibly helpful sewing tools. They come in so many widths and lengths.
They have extra markings for cutting fabric on the bias.
You can use them in place of a T-square.
They’re sturdy.
Shoot, you can hang them on a wall.
I have several quilting rulers, but the one I can’t live without is this 3″x18″ one from O’lipfa. 3″x18″ is a great all-purpose size. I use it to make bias tape, cut waistbands and neckband. In my ruler collection, I have a larger 8.5″x24″ beast. The bigger ruler is more practical for checking grainlines and making big pattern pieces. For most things, it’s almost too much ruler.
Whatever size, find a ruler you like and stick with it.
9. French curve ruler

If you sew garments at all, a French curve ruler is a must. It can help you draw pretty curves akin to your own body’s curves for your arms and hips.
And they can be a shortcut to drawing a nice curve when you’re fitting a pattern. And if you draft your own patterns, a French curve will be invaluable.
I love the little graph paper-like 1/8″ squares that can help you add seam allowances quickly.
Want to change a neckline quick? Fix a hip curve? Change up a sleeve?Yup, your French curve has your back.
You + French curve =pattern hacking magic
10. Chalk wheel

You can fabric for your sewing projects with so many different types of pens. But the one marking tool I will always turn to is a chalk wheel.
They’re small and they make razor sharp lines without damaging fabric. It’s my favorite universal marking tool. I get my chalk wheels and extra chalk locally at Colorado Fabrics. This Dritz chalk wheel is similar. And here is some refill chalk. I’ve heard really good things about the Chakoner too.
11. Simflex

The Simflex easily wins the competition for the coolest looking sewing gadget.
It’s an expandable gauge that you use to help mark where buttonholes go.
If you’ve ever tried to mark where buttonholes go from a paper pattern, you know that the paper can shift unless you’re really careful. What you can end up with is a hot mess of unevenly spaced buttonholes. Not so cute.
The Simflex works so well because you only need to know where your top buttonhole and the bottom buttonhole go. When you have those two anchors, expand the gauge and use the slots to mark the rest.
The max distance between buttonholes is 3.5″ for 8 buttons. If you need more space vertically between holes, you can simply measure between 2 holes and skip every other marking slot.
So those are the 11 helpful sewing tools I personally can’t live without. What about you? Tell me in the comments: which is your favorite sewing tool? Did your favorite make the list? Dish!!
More awesome sewing tools to try and compare

Rotary cutter vs. scissors
Why each is an essential tool and when to use each one.

Sewing tools to keep you accurate
Rulers, the best measuring tapes, hemming gadgets, and things to help you measure curves more accurately

Transfer pattern markings the right way
Marking tools that work for every kind of fabric + some vintage tried and tested methods to help you transfer marks like a pro

Elizabeth Farr is the writer behind the Elizabeth Made This blog where she shares helpful sewing tips, step by step sewing tutorials and videos to help you explore your creativity through sewing. She has written sewing Eguides and patterns, been a featured teacher at Rebecca Page’s Sewing Summit and Jennifer Maker’s Holiday Maker Fest and her work has appeared in Seamwork and Altered Couture magazines. She also created a line of refashioned garments for SEWN Denver. When her sewing machine isn’t humming, she’s playing and teaching violin, and hanging around a good strategic board game with her husband and 4 kids.
I love everything on your list! There are some things that I would like to get from your list. I didn’t know the Gingher embroidery scissors doubled as a seam ripper. I would like a clapper (Love the name!), because one day I would like more crisp collars. I think the buttonhole marking tool looks very cool and is must have. I love the idea of the glass pins, because melted pins are not my friend. So many get stuck to my iron. My favorite tools are my Clover chalk rollers. I have tried marking pencils, which weren’t helpful for me at all. I love that the chalk only comes off when I need it to. Kudos to whom ever came up with that idea! Loved this article!!!
Thanks Capresha! A clapper will change all your collars and denim sewing forever! I have a few of those melted pins too, LOL! The Clover chalk gadgets are great too–love that ultra fine line!
Those Kai scissors sound interesting. I’ve been using those springy Fiskars ones for years because it’s easy on my carpal tunnel, but I feel like they only last a year or two and then I have to relegate them to paper scissors. And somehow, I’ve ended up never getting a tailor’s ham, though I have some variation of every other tool you mentioned, if not the same thing.
My Mom always had the springy Fiskars–they are pretty nice on your hands, but I had the same experience as you of them losing their edge. Kais were an investment but definitely have helped with my own repetitive motion issues. Hams are the best! Such pretty curves with them!
I pretty much have everything on this list! The only thing I don’t have is a clapper/press thing – instead I just use a scrap of wood. I would like my husband to make me a real one though. I recently switched from Ginghers to Kai after my Ginghers got loose and I found basic Kai’s on Amazon and Wawak for under $20. I love them so much more than my Ginghers!
Scrap wood is really smart for a clapper! I think the one I have is maple so it seems a lot denser than the 2×4 scraps we have in the garage–but no matter. It’s always a good thing to use what you have! That’s an awesome deal on your Kais! I love mine so much more too!
I started using a clapper when I decided to fuse lightweight interfacing on the back of a really scrappy quilt block. I hate the little bubbles and waves that sometimes appear with fusibles, but the clapper did its magic and no bubbles.
I don’t know if it cools it off or holds the heat, but it works.
And I love the idea of wearing your embroidery scissors. I’m always mislaying my favorite pair.
Thanks!
Jan
You’re so right Jan; clappers are so useful for so many things. That’s a great idea with interfacing! And forgetting where I put my embroidery scissors is exactly why the ribbon happened. As long as you’re careful with them, it’s so handy to have them right there at all times!
Tape measures?!!!
Yup, they are essential as well.
Hi
Where did you get your ironing board cover in the gadget video with the of fashion pattens in it ? Love it
Thank you
I made it. This is one I need to do a tutorial for.
colleenoke@shaw.ca
I need the buttonhole placement gadget. where do I find one?
Also an Ironing board cover. I have a larger ironing board than the regular sized one. Looking forward to a tutorial on this. also any others you have online.
Thank you
I love all these things, and am glad to have them too. I just got myself a buttonhole gauge, and I would warn someone shopping for one that you need to take care, when using it, that you ensure the spaces between the gauge points are even. I was assuming it would always smoothly pull out and retract, and that the spacers would be evenly spaced. In fact, at least on the one I got, it’s sort of sticky and you do need to hold it against a ruler or yardstick to ensure your spaces are even.
I like the fact that the gauge lets you mark both the buttonhole side and the button side and know they should align (if you’re careful about where you place the gauge on both plackets). Because it is a little sticky to move the spacers, you know that you are unlikely to accidentally shift it to the wrong position when moving it from one placket to another.
That is absolutely true about that tool, but you’re totally right, if you pay attention to making sure that you’re opening it evenly, it’s a gem. I will never make anything with buttonholes without it for its simplicity and accuracy in marking both sides of the placket.